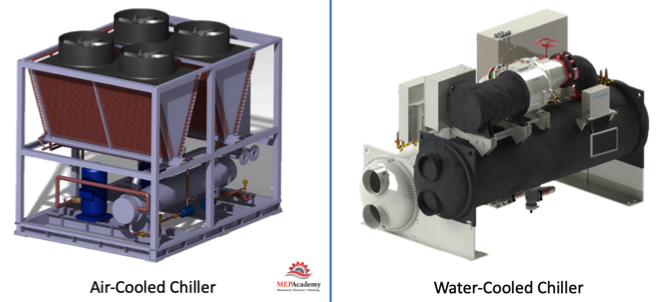
Chillers are used to cool water that is then used to cool the occupants of buildings. The Chiller comes in two basic condenser side designs, either it’s water-cooled or air-cooled. This designation is referring to how heat is rejected from the system, either the heat is rejected by water or air.
If you prefer to watch our FREE YouTube version of this presentation, scroll to the bottom.
Main Chiller Components
There are four main components in a chiller. These same four components can be found in all air conditioning units with slight differences in configuration.
- The Compressor (The Refrigerant Mover)
- The Evaporator Coil (Heat Exchanger) – Absorbs Heat
- The Condenser Coil (Heat Exchanger) – Rejects Heat
- The Expansion Valve or Metering Device (Refrigerant Traffic Cop)
The difference between an air-cooled and a water-cooled chiller begins with the method on which they eject heat, and as their prefixes imply, one ejects heat with air the other using water. They both use the basic refrigerant circuit with modifications. Below is the standard refrigerant circuit you’ll find in just about every piece of air conditioning equipment including chillers with some modifications.
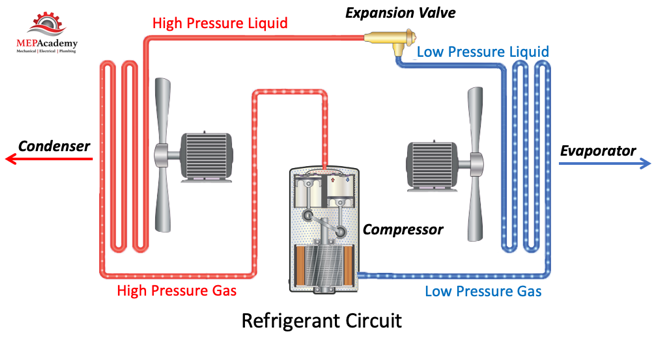
Basic Refrigerant Circuit
Notice that the evaporator and condenser both use a fan to blow air over a coil to absorb or eject heat from the refrigerant circuit. See our video on Refrigerant Circuits.
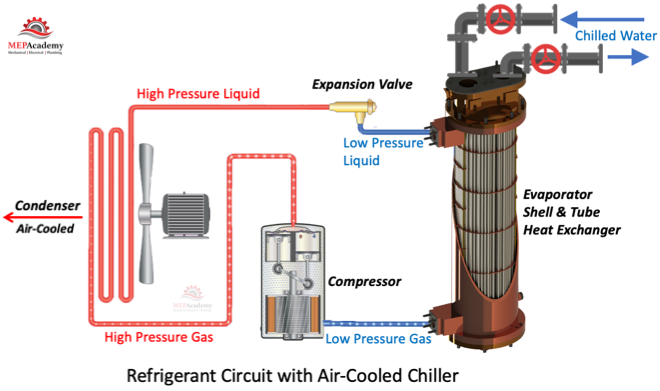
Refrigerant Circuit for Air-Cooled Chiller
The refrigerant circuit for an air-cooled chiller replaces the evaporator fan with a Shell and Tube Heat Exchanger. (See image below). The low side liquid refrigerant will enter the shell and tube heat exchanger and absorb the heat from the chilled water return. The refrigerant surrounds the tubes while the chilled water enters the tubes, the two never mix. The refrigerant circuit is completely isolated and separate from the chilled water circulating.
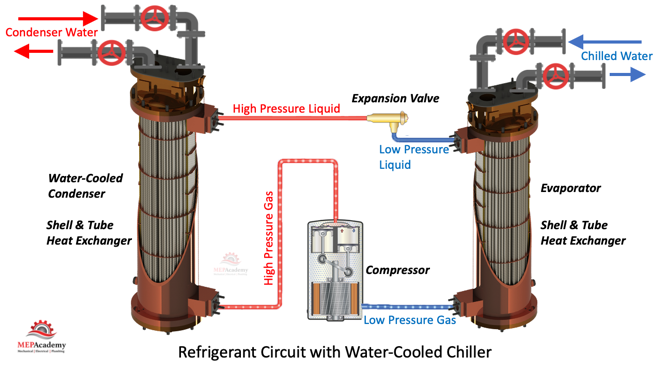
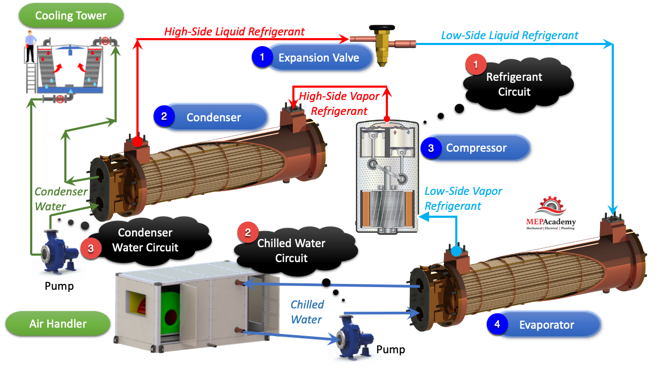
Refrigerant Circuit for Water-Cooled Chiller
With a water-cooled chiller we have eliminated both the condenser and evaporator fans, as water is the medium by which the heat will be passed around. We have replaced the condenser fan with a Shell and Tube Heat Exchanger where condenser water will take the heat from the High Pressure Refrigerant and eject it through a cooling tower of some sort.
As you see from the three refrigerant circuits there are always the same four components, Evaporator, Condenser, Compressor and Expansion Valve. The only real difference is in the method they absorb and reject heat (Air or Water).
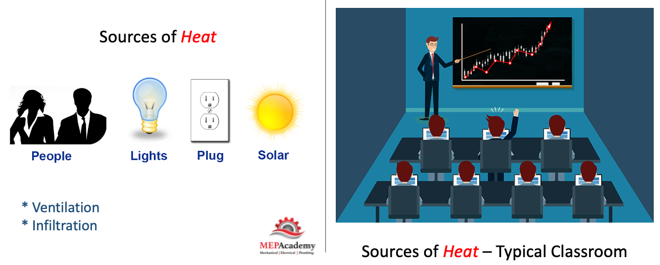
Heat Source
Remember that the basic function of the chiller is to move HEAT. To absorb heat from within the building and then to toss it out of the building. It’s the process of evicting heat from the building. Remember that you make the air cooler by removing heat. Heating and cooling is accomplished by either adding heat or removing heat from any medium. Heat moves from the warmer source to the cooler one.
Where does the heat come from? It comes from the People, lights, plug loads and solar through walls, windows and the roof. There will also be heat and moisture brought in from the code required ventilation air or outside air and infiltration, air that leaks into the building. See Video on “Calculating Cooling Loads“.
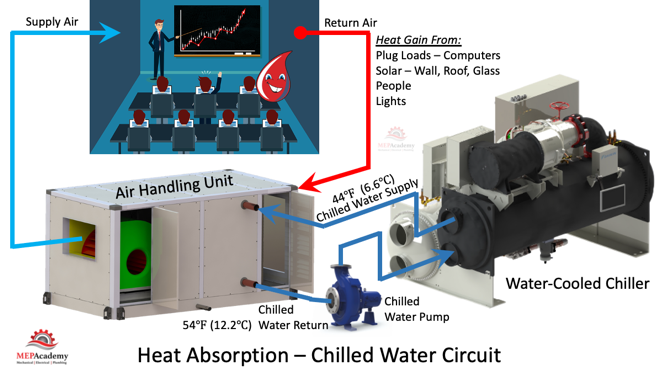
Heat Absorption Cycle
The process begins by absorbing heat from the space and any ventilation or outside air added at the Air Handler. The heat enters the air handler from the return air brought from the occupied spaces along with outside air added for ventilation. This air blows over the Chilled Water coil located in an Air Handler where it gives up its heat to the chilled-water being circulated from the chillers evaporator. The cooled air is then supplied to the room from the air handlers supply fan through sheet metal ductwork to air diffusers in the occupied space.
The chilled-water supply enters the cooling coil at about 44°F (6.6°C) and the heat is taken back to the chiller in the chilled-water return piping at approximately 54°F (12.2°C). The chilled water has increased 10°F (6.6°C) by absorbing the heat from the space (return air). The chilled water will then be returned to the chiller will it will give up its heat to the evaporators heat exchanger as part of the refrigeration cycle.
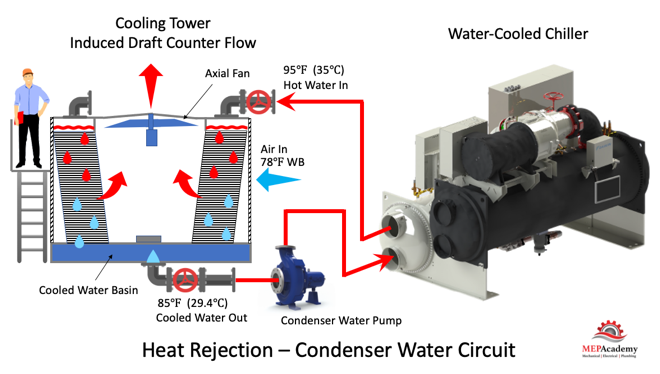
Heat Rejection Cycle
Now that we have absorbed the heat from the building space and any ventilation air, we’ll need to toss this heat out of the building. The chillers refrigeration cycle will transfer the heat from the evaporator to the compressor where it will be increased in pressure and temperature.
After the compressor the refrigerant is now in the high-side of the refrigerant circuit where it enters the condenser. The condenser will rejects this heat into the air or water depending on the type of chiller (air-cooled vs water-cooled).
Heat Rejection Air-Cooled vs Water-Cooled Chillers
As previously discussed water-cooled chillers use some form of cooling tower to reject the heat, see our video on “How Cooling Towers Work”. The high side refrigerant gas that enters the water-cooled chillers condenser will change from a refrigerant gas to a liquid as it gives up its heat to the condenser water circulating through the shell and tube heat exchanger. That heat is taken in the condenser water to the cooling tower where it is transferred to the ambient air passing over the tower fill.
An air-cooled chiller is a mostly self-contained unit, although there are version of the air-cooled system that can have separated sections, the most common is a one-piece unit.
Space Requirements
Of course one of the difference between the two style of chillers is that an air-cooled chiller will be located outside, while a water-cooled chiller is almost always located indoors. This will require real estate for either style, whether that is outside or inside. In addition the water-cooled chiller will require a cooling tower that is often located on the roof or somewhere on grade. Depending on the size of this equipment, they can become very heavy requiring structurally engineered supports, especially roof mounted cooling towers and chillers.
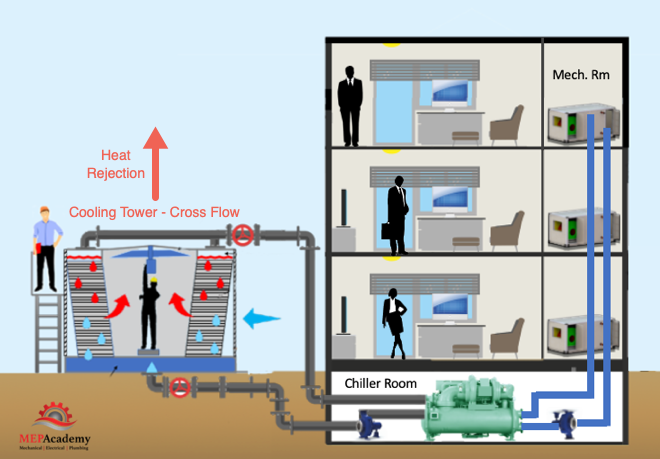
Water-Cooled Chiller with Ground Mounted Cooling Tower
Above we show a Water-Cooled chiller located in the basement of an office building with the Cooling Tower on ground level. Chiller feeds the air handlers on each floor with chilled water, and then the fan of the air handler blows cold air into the occupied spaces.

Water-Cooled Chiller with Roof Mounted Cooling Tower
In the above image we show the Water-Cooled Chiller in a ground level mechanical room with a cooling tower on the roof. The cooling tower is going to require that the roof be reinforced to handle the additional weight of the tower.
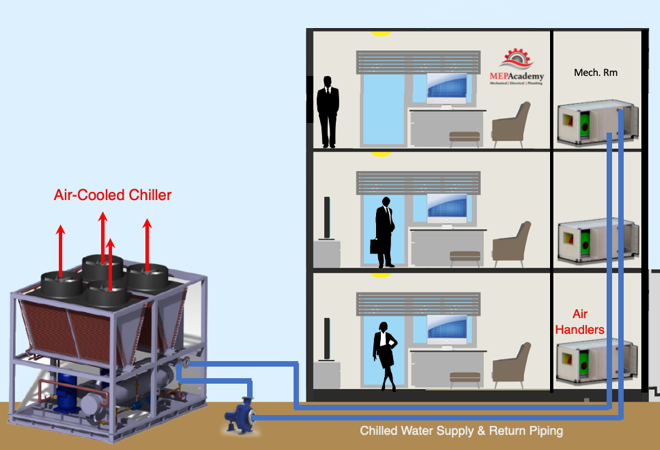
Air-Cooled Chiller Ground Mounted
As shown in the above image an Air-Cooled Chiller has a much easier layout without the requirement for a cooling tower to reject the heat.
Main Components of a Chiller
The first component is the compressor which provides the energy to move the refrigerant around the refrigerant circuit.
The second component is the evaporator where heat is absorbed from the building and the water is cooled down to be used within the building to cool the space.
The third component is the condenser which rejects the heat from the building into the water going to a cooling tower or in an air-cooled chiller the heat is rejected to the outdoor ambient air.
The expansion valve or metering device, is called by various names but it functions as the gate keeper between the high-side (Condenser) and low-side (Evaporator), and is the forth component. This valve meters the amount of refrigerant that can pass from the high-side to the low-side based on the demand for cooling. More cooling required will cause the expansion valve to allow more refrigerant to pass through it, going from the high-side to the low-side of the system.
Water-Cooled Chiller
When looking at any water-cooled chiller there are several ways to spot which of the two shell and tube heat exchangers is the evaporator vs the condenser, as they both physically look the same. The evaporator should have insulation on it to avoid absorbing heat from the surrounding mechanical room. The condenser doesn’t need insulation. Also, the evaporator should have a short stub of pipe coming off of it into the center of the compressor.

The condenser doesn’t need insulation and you should notice that the compressor discharges off its periphery into the condenser with a short stub of pipe.
The expansion valve or metering device is often hidden underneath, but will be located between the two heat exchangers.
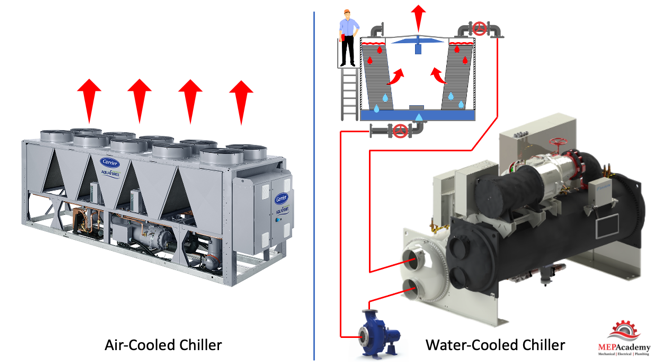
Air-Cooled Chillers
These are easy to identify as they are most always located outside and you’ll see the fans located on them, mostly on the top an using axial fans that induce air over the condenser coils. These chillers have all the same components as a water-cooled chiller except a shell and tube type condenser isn’t used. The Air-cooled chillers use an condenser exposed coil with ambient air induced or blown over it to reject the heat.
Summary
You may be thinking, if Air-Cooled chillers only require a single piece of equipment as opposed to water-cooled chillers that require a cooling tower of some sort, than why don’t all mechanical engineers specify only Air-Cooled Chillers. Several reasons are that air-cooled chillers aren’t as efficient as water-cooled chillers and some codes restrict the total tonnage of air-cooled chillers that can be used at one facility.
When looking at any piece of air conditioning equipment or chiller, look to identify these four components. The difference between water-cooled and air-cooled chillers are in how the heat is rejected from the system. In a water-cooled system, water is used as the method for heat rejection, while air-cooled chillers use air as the heat rejection method, hence the naming.
If you haven’t seen our video on refrigerant circuit, then be sure to watch that for a more in-depth explanation of the refrigeration cycle.