


 Overrides: Risks, Failures, and Best Practices")


Chapter #1- Rectangular Duct and Fittings
In order to do a takeoff, you will need to be able to understand what rectangular duct and fittings look like and how they are represented on the drawings. They can be drawn either as a single line or as a double line, making their appearance much different. We will show you both ways so you can identify any fitting in its single line or double line format.
Engineers use software programs such as AutoCAD or BIM (Building Information Modeling) that have standard duct and fitting symbols, in addition they have the ability to create their own representations of what duct and fittings look like on the drawings, but once you know what to look for you can identify the slight differences.
Rectangular Ducts
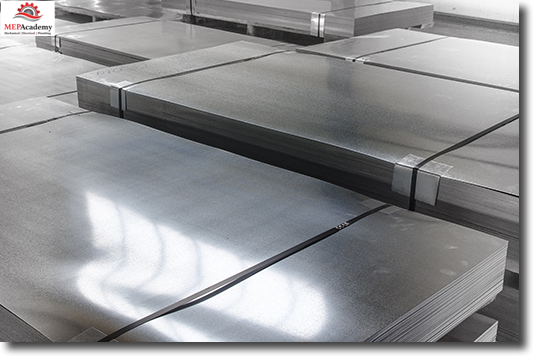
Ducts come in various lengths depending on the fabrication equipment available to the contractor. For those sheet metal fabrication shops that have a coil line where sheet metal comes from the manufacturer in large coils of various gages (Thickness) the cost of fabrication can be reduced because of automation. See Sheet Metal Shop Fabrication course for more information.
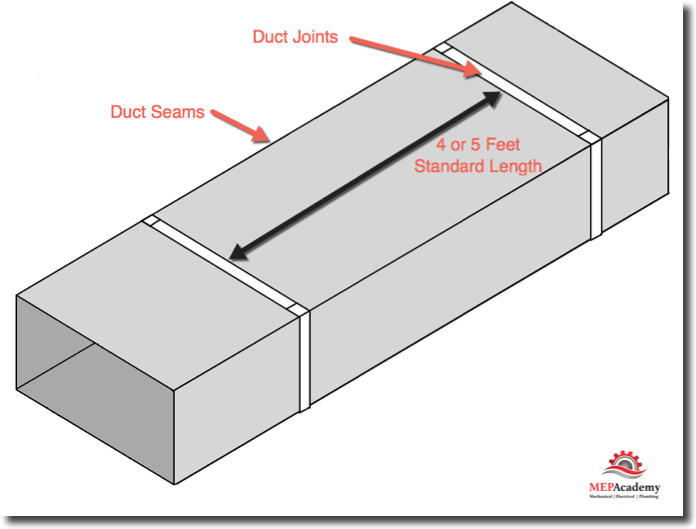
Typical sheet metal coil widths are 36”, 48”, 60” and 72”. Sheet metal can also be purchased in flat sheets typically 36” x 96”, 36” x 120”, 48” x 96”, 48” x 120”, 60” x 96” and 60” x 120”. Standard duct lengths can be 4 or 5 feet long from joint to joint, not taking in to consideration the loss of length due to the joint itself, unless you’re using a proprietary slip on joint.
If the standard widths of coils and flat stock are 36”, 48” and 60” then this is usually what the standard lengths of sheet metal ducts you will be using in commercial construction. You want to optimize the length of the duct so as to avoid extra material handling which increases your labor cost.
Rectangular duct is often more expensive to make then the equivalent round duct. Round spiral duct is made using a spiral machine then spins out round duct from a coil of sheet metal. Because round comes in standard sizes and is easily spun the cost tends to be less than its rectangular equivalent.
Knowing the length of a standard sheet metal coil line duct will help you determine how many short pieces you have when doing a takeoff. A short piece is a piece of duct shorter than your standard length. This short piece will have to be done my hand in the shop instead of being put through the automated coil line. Short pieces cost more per pound than does coil line duct. It’s less expensive for the automated coil line to make a piece of duct then to have it made with manual labor.
Ducts can be shipped fully assembled or in knocked down “L” sections. Having the duct shipped in “L” sections (knocked down) allows for more sheet metal to be shipped as it is easy to nest them together. This will also increase the field labor as they now have to knock together the “L” sections of duct.
Joints
The duct joint is that portion of the duct that attaches to the following section of duct or fitting. Joints can be made from the section of duct or fitting or can be an attachment to the end that facilitates the connection of two pieces. There are various types of joints, the most common being; TDC (transverse duct connector), Ductmate, S&D (Slip and Drive), Welded, and Standing S and Drive. (See Chapter on Sheet Metal Joints)
Seams
The seam is that part of the duct that attaches to another part of itself to assemble the duct section or fitting together. Seam types vary based on pressure class and the largest dimension of the ductwork, your company preference or jurisdictional requirements. Some of the most common seam types are the Pittsburgh Seam, Snap Lock, Gore Lock or Welded Seam. (See Chapter on Sheet Metal Seams)
Rectangular Fittings
Rectangular fittings cost more than rectangular straight duct because of the additional labor to cut and assemble each piece of the fitting. Fittings require multiple pieces to be cut form the metal then assembled into the final shape. We will go over the various types of fittings most commonly found in commercial construction.
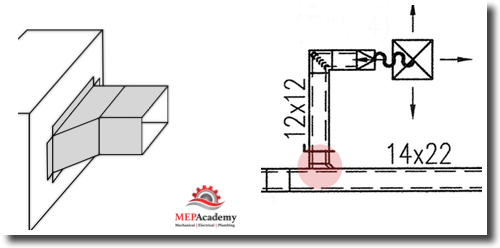
Starting Fittings
Whenever you have a piece of duct tapping into the side of another duct you will need a starting fitting. This starting fitting allows you to firmly attach to the other piece of duct and provide for a proper seal, so as to avoid leakage. Ducts that leak are effectively losing money, as the cost to cool or heat the air is lost to the attic or outside.
Each of these starting fittings will get you connected to the side of the rectangular duct or round duct, just like in the chapter on round duct.
Rectangular on Rectangular
You want to make sure that the rectangular duct you’re attaching to is at least a couple inches greater than the duct that is being attached. For example of the main rectangular duct was 20 inches in depth, then you would use an 18 inch or smaller in depth branch starting fitting. This allows space for the duct seams. Remember that the first dimension that you see belongs to the side that is visible in the view.
45 Degree Tap
Using a 45 degree tap provides better flow characteristics than a straight tap. These are commonly used on the supply side, while the straight tap is commonly found on the return or exhaust ducts.
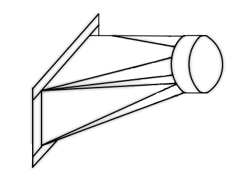
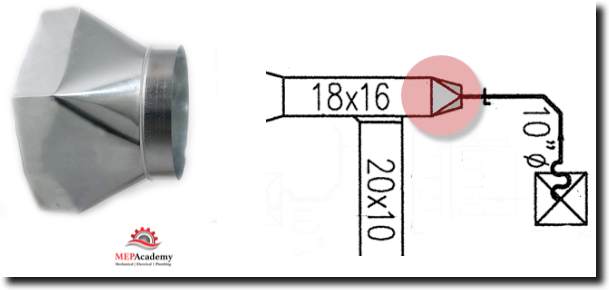
Square to Round Tap
These are often used when the depth of the rectangular duct is less than the round size of the branch being connected. For example this allows for a 12” round spiral duct to be attached to the side of a rectangular duct that is only 10” high. This type of fitting also offers the additional benefit of providing better air flow characteristics.
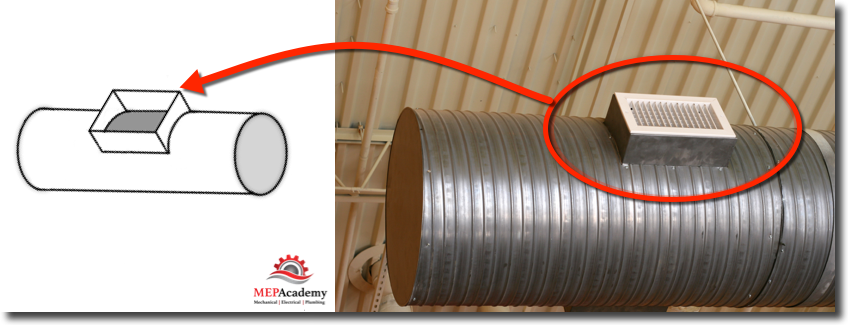
Rectangular Tap on Round Duct
This is often used to mounted rectangular supply grilles on the side of a large round main duct. You may see this arrangement where there are no ceilings installed, such as; Gymnasiums, Restaurants, Warehouses, etc.
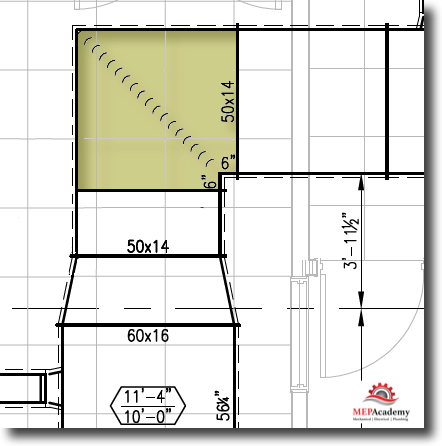
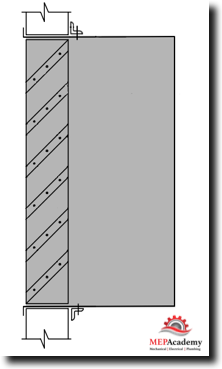
Square Elbow with Turning Vanes
The elbow is found where you want to make a 90 degree turn. The use of turning vanes allows for the smooth change in direction of the air, instead of it pounding against the side of the fitting. Turning vanes are mostly used on the supply air side of the system, while elbows without turning vanes are often used for negative air systems like Return Air and Exhaust. Turning vanes come in various designs including single thickness, double wall, and the expensive double wall acoustical turning vane.
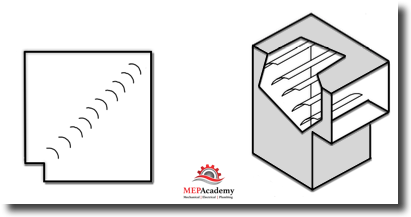
Here is what an elbow with turning vanes look like on a drawing drawn with double lines.
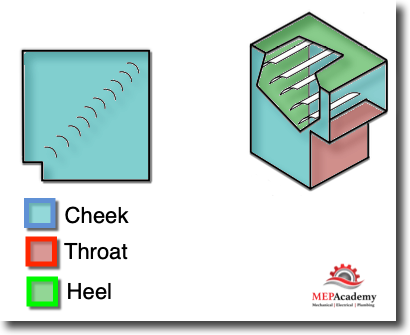
The square elbow has four basic pieces; Cheek, Throat, Heel and Turning Vanes.
There are several types of turning vanes used in elbows. You should verify with the specifications as to the requirements of the turning vanes on your project. The most common turning vanes are; single wall, double wall and acoustical turning vanes.
Single Wall Turning Vanes
Double Wall Turning Vanes
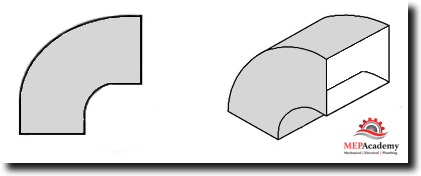
90 Degree Radius Elbow
Similar to the square elbow in that it provides a 90 degree turn in your sheet metal ductwork. Instead of an abrupt turn like the square elbow, this elbow provides for a 90 degree radius turn. Turning vanes can be added to this fitting also, but it’s not as commonly specified. The 90 Degree Radius Elbow takes up more space when turning then for the same size 90 Degree Square Elbow.
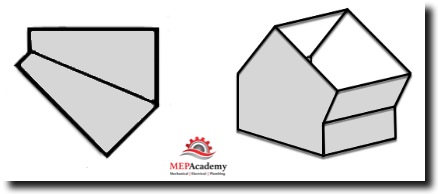
45 Degree Angle
In order to route duct through buildings and around obstructions and other utilities you will need to offset as required. The 45 degree angle is commonly used to offset around obstructions.
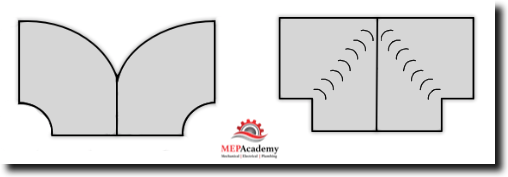
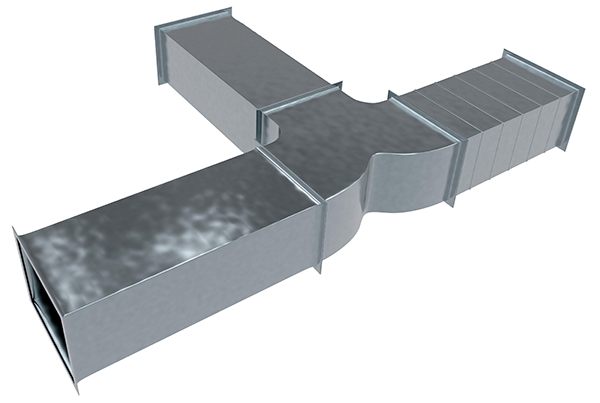
Bullhead Tee – Double Elbows
The use of this fitting allows for the simultaneous 90 degree turn in opposite directions. This can be done using either hard square elbows or radius elbows.
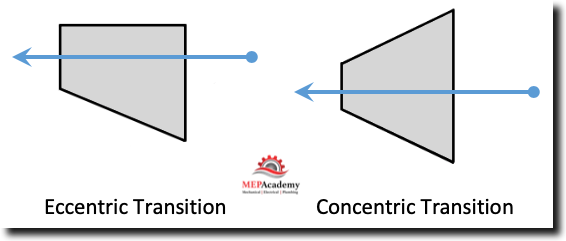
Transitions – Eccentric & Concentric
A transition allows you to reduce the size of your ductwork. This is done when CFM (Cubic Feet per Minute), the volume of air has been reduced in the duct to where it makes sense to use a smaller size. There are several standard transition configurations; eccentric is where you transition one side only, and concentric where you converge two sides to maintain a centerline path for the air flow.
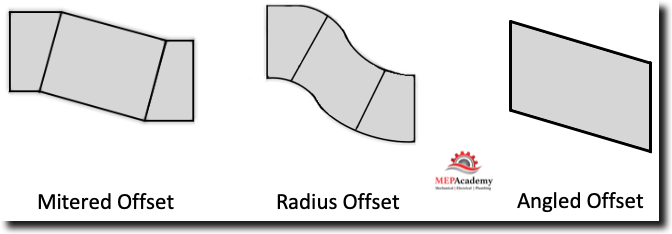
Offsets – Ogee’s
The use of an offset allows for the designer to get around various aspects of the built environment such as; plumbing pipes, structural elements, electrical conduits, fire sprinklers, lights, other ductwork, etc.
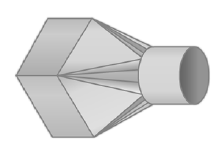
Square to Round
Similar to the previous square to round tap above, this fitting is used on the run instead of tapping into the side of the duct. Converting to round duct from rectangular duct is usually a more cost effective solution and allows for the use of flexible duct connections to a piece of air distribution.
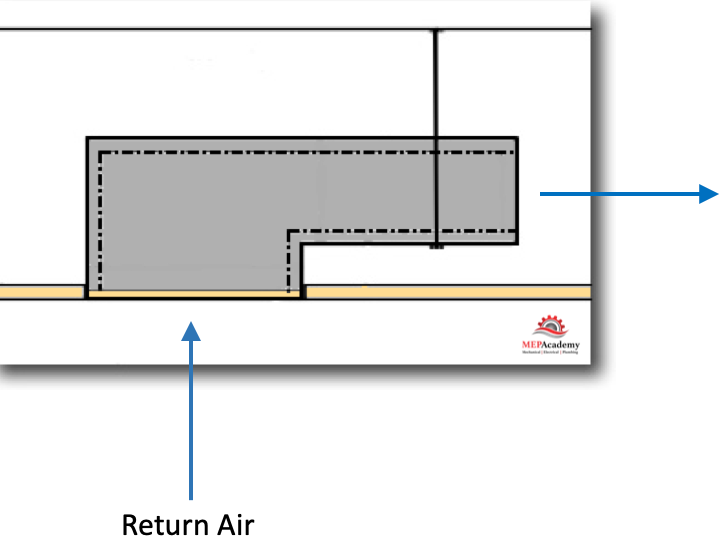
Transfer Duct
The purpose of the transfer duct is to allow air that is trapped in a space by a full height wall, to make its way through that wall to the other side where it will return back to the system, whether an exhaust fan or air conditioner of some sort. This often occurs in non-ducted return air systems.

Return Air Sound Boot
The return air boot helps reduce noise transmission from one space to another with the use of lined duct attached to a 90 degree elbow.
Louver with Plenum
A louver serves the purpose of providing weatherproof openings in the building structure to allow air to enter or be exhausted from the building. You could find exhaust ducts terminating at a louver or outside air being brought into the building to provide code required ventilation (fresh air) for the building occupants.
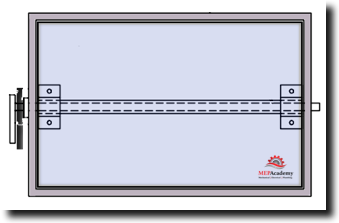
Volume Dampers
Volume dampers provide an important role in the air balancing of the system. Each branch duct should have a volume damper that allows the volume of air to be adjusted. The engineer designs the HVAC system with a specific CFM (Air Volume) for each space in the building and for each piece of air distribution. The contractor will hire or self-perform an air balance to get the system to provide the quantity of air as indicated on the drawings by the design engineer.
The volume damper is used during air balancing to adjust the volume of air that comes out of the air distribution device. It is not good engineering practice to try an use the air distribution device as a volume damper, as the closer the restriction is to the air distribution device the greater the noise will be to the space.
Duct Liner
Sheet metal is either wrapped with insulation or lined with insulation. Liner can be used for either thermal or acoustical reasons. If the HVAC air duct is traveling through an unconditioned space then the ductwork will need to be wrapped or lined with insulation to avoid the loss or gain or heat. This is a code requirement and is meant to avoid a loss in energy. Lining a duct is also used to eliminate or reduce the transmission of noise. Watch this video to see how the liner is fastened with pins welded to the metal. A version of this machine can be installed in-line with a fully automated coil line.
Duct liner comes in various thicknesses depending on the thermal or acoustical properties required. Common sizes include 1/2”, 1”, 1-1/2” and 2” liner. Liner is attached in the sheet metal fabrication shop with the use of pins and adhesive. (See Chapter of Sheet Metal Coil Line for automated process)
Double Wall Duct with Perforated Liner
To reduce noise within and through ducts and fittings they are lined with sound attenuating (noise reduction) duct liner (#2) and inner wall of perforated liner (#3). You would have your external sheet metal duct or fitting material (#1) with acoustical liner (#2) fasten with adhesive and sandwiched with the perforated metal (#3). This is done in all shapes of ductwork and fittings, including rectangular, round and oval.
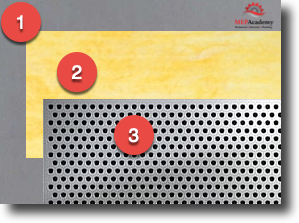
The noise is attenuated by the small holes which attract the noise into the fiberglass insulation that is sandwiched between the inner and outer wall. It’s obvious that this type of duct is going to cost much more than the standard ductwork. You may find this required for the first 25 feet more or less from any noise generating equipment, like a fan within an air handler. Check the specifications and drawing note and details.
Duct Wrap – Insulation
Duct wrap as mention above is used for its thermal protective properties. Keeping heat from escaping or entering the sheet metal duct is important to preserve the usage of energy. Duct wrap usually comes in the following sizes based on the R-Value required to meet the local building or energy code; 1”, 1-1/2”, 2” and 3”. The insulating of ductwork on large commercial projects is usually handled by a subcontractor of the HVAC contractor. These contractors specialize in the insulation of ductwork and piping related to the HVAC and Plumbing industry.
Sealants
Sealants are used to ensure a proper seal at seams and joints. It’s important that construction of the ductwork that is carrying conditioned air is air tight. There are various types of sealer used; duct tape, silicone, hardcast, etc.
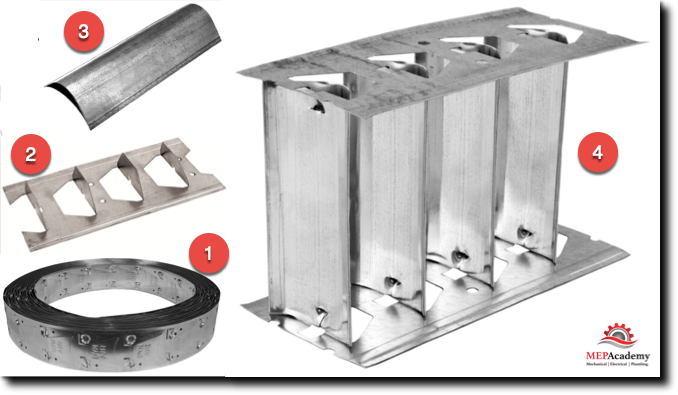
Turning Vanes
The use of turning vanes provides for better air flow and fluid dynamics. Turning vanes are comprised of the vane rail (#2) which comes in coils (#1) and the turning vane (#3). When these two components are assembled you will have the turning vane assembly (#4) which then gets inserted into the elbow or fitting. The parts shown here are from Hardcast by the Carlsile Company.
Welded Ductwork
See chapter on Grease Exhaust Systems.
Sheet Metal Field Installation Course
- Chapter #1- Rectangular Duct and Fittings
- Chapter #2 – Round Ductwork and Fittings
- Chapter #3 – Sheet Metal Duct Hangers
- Chapter #4 – Sheet Metal Field Labor Productivity
- Chapter #5 – Labor Crew Sizes
- Chapter #6 – Sheet Metal Duct Sealer
- Chapter #7 – Sheet Metal Details and Specialties
- Chapter #8 – Grease Exhaust
- Chapter #9 – Air Distribution
- Chapter #10 – Rental Equipment
- Chapter #11 – Conditions Affecting Field Labor
- Chapter #12 – HVAC Equipment Labor