Air purifiers can significantly improve indoor air quality, but their effectiveness largely depends on their placement. Use these Air Purifier Placement Tips to strategically position your air purifier, so you can enhance its performance and enjoy cleaner, healthier air throughout your home or office. Let’s explore the best locations for air purifiers in various rooms and situations.
Air Purifier Placement Tips
Central Location
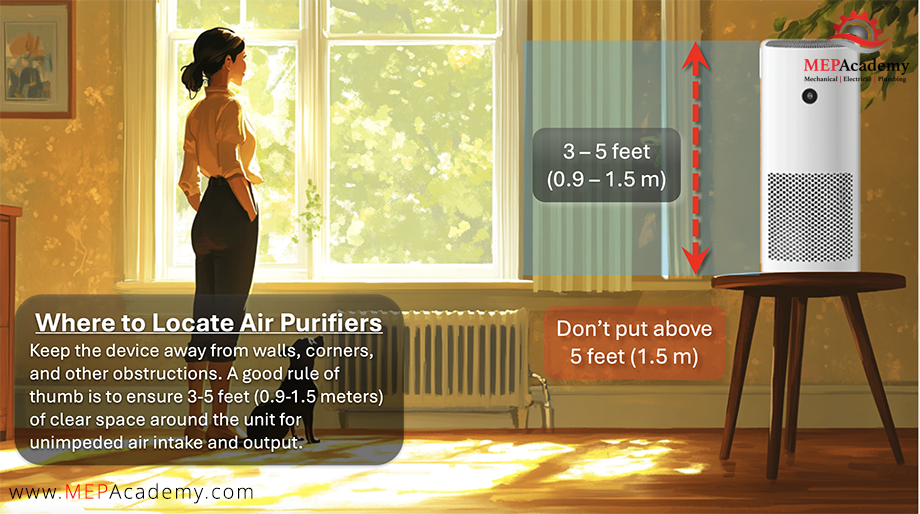
Place your air purifier in a central area of the room to allow for efficient airflow and circulation. Keep the device away from walls, corners, and other obstructions. A good rule of thumb is to ensure 3-5 feet (0.9-1.5 meters) of clear space around the unit for unimpeded air intake and output.
Elevation
Positioning your purifier slightly off the ground can improve its performance. For small, portable units, placing them on a table or shelf can be beneficial. It’s recommended to elevate the air purifier no higher than 5 feet (1.5 meters) off the ground.
Near Pollution Sources
Position your air purifier between people and potential pollution sources. For example, if you have a wood-burning fireplace, place the purifier nearby to capture smoke particles.
Room-Specific Air Purifier Placement Tips
Bedroom
Place the unit 6-10 feet (1.8-3 meters) from the head of your bed. This allows the purifier to clean the air you breathe while sleeping without blowing air directly at your face. Choose a quiet unit to minimize sleep disturbances.
Living Room
- For living rooms, which are often larger and more open:
- Position the purifier in a central, open area for maximum coverage.
- Place it near key seating areas like the couch, ensuring furniture doesn’t block the device.
- Avoid tight spaces where airflow might be restricted.
- Keep the purifier away from electronic devices.
Kitchen
- Kitchens are hotspots for odors, smoke, and grease particles. To combat these:
- Position the purifier near the cooking area but away from direct heat sources.
- Place it close to sources of odors, such as near the garbage bin.
- Opt for a unit with a high-quality activated carbon filter for effective odor removal.
Home Office
In a private office, place the air purifier where it won’t be distracting or interfere with your work area. Ensure it’s positioned to effectively circulate air throughout the space. Consider placing it near your desk to reduce dust and particles you might breathe in while working.
Office Spaces
For larger office environments:
- Place air purifiers in high-traffic areas like reception areas or near photocopiers.
- Consider multiple units for open-plan offices, strategically placed to cover the entire space.
- Position purifiers near ventilation systems to help clean incoming air.
- In conference rooms, place units near seating areas for optimal air cleaning during meetings.
Special Considerations
Pet Areas
Position the air purifier as close as possible to where your pets spend most of their time. This helps capture pet dander and odors.
High-Traffic Areas and Entryways
Place an air purifier near entryways or in hallways to capture pollutants before they spread to other rooms.
Multi-Room Homes or Offices
If you have multiple air purifiers, position them strategically across different rooms. Leaving doors slightly open allows air to circulate between spaces.
Calculating Air Purifier Needs
To determine the right air purifier for your space:
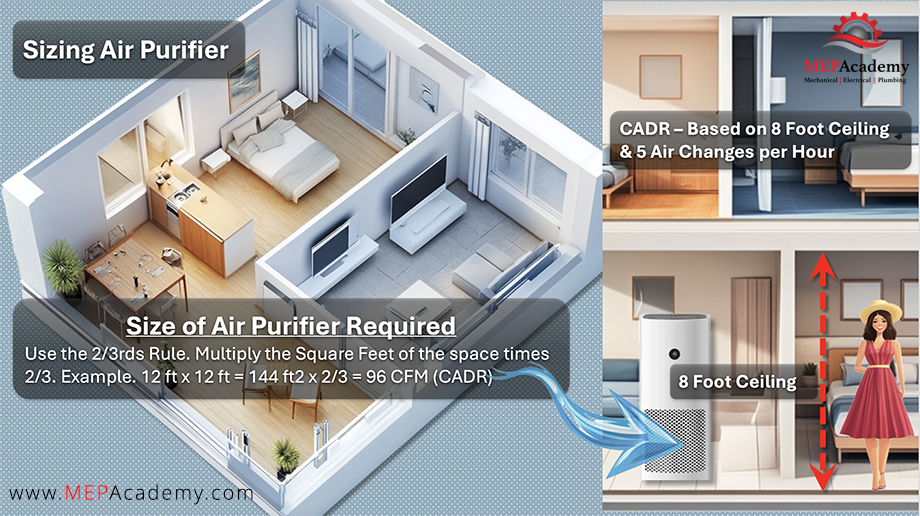
Calculate the room size: Multiply length by width. For example, a room 12 feet (3.7 meters) long and 10 feet (3 meters) wide is 120 square feet (11.1 square meters).
Consider the CADR (Clean Air Delivery Rate): Your air purifier’s CADR should be roughly two-thirds of the room’s square footage. For a 150-square-foot (13.9-square-meter) room, aim for a CADR of at least 100. This calculation is based on 5 Air Changes per Hour as follows. 150 ft2 x 8 ft = 1,200 ft3 x 5 ACH = 6,000 / 60 minutes in an hour = 100 CFM or 100 CADR.
Account for ceiling height: Standard CADR is based on 8-foot (2.4-meter) ceilings. For higher ceilings, opt for a higher CADR rating to account for the additional air volume. See section below to calculate higher ceiling area’s, those greater than 8 feet in height.
The Step by Step Method to Determine Size of Air Purifier required for Increased Ceiling Heights
Step 1: Calculate Room Size
- Measure the length and width of the room in feet (meters).
- Multiply length by width to get the square footage (square meters).
- Measure the ceiling height.
- Multiply the square footage (m2) by the ceiling height to get the room volume in cubic feet (m3).
Step 2: Determine Required CADR
Multiply the room volume in cubic feet (cubic meters) by 5 to get the minimum CADR needed in ft³/m (CFM) or m³/hr. CADR is measured in cubic feet per minute (CFM) or cubic meters per hour (CMH).
For rooms with standard 8-foot ceilings, aim for a CADR that’s at least two-thirds of the room’s square footage, which provides 5 Air Changes per hour and assumes an 8 foot ceiling.
Step 3: Consider Air Changes per Hour (ACH)
Air changes indicate how many times in an hour the volume of air within the room is circulated through the air purifier. The higher the number the greater the times the room air is purified through the machine.
Decide on the desired ACH (typically 3-6 ACH for residential spaces).
Use the formula: 1 ACH = Room Volume (ft3) / 60 Minutes
Step 4: Select Appropriate Air Purifier(s)
Choose air purifier(s) with a combined CADR that meets or exceeds the calculated requirement.
For larger spaces or whole-house purification, consider multiple units to achieve the desired CADR.
Step 5: Adjust for Special Conditions
For rooms with higher ceilings, increase the CADR requirement proportionally.
In areas with higher pollution levels, opt for higher ACH (up to 12 for very polluted spaces).
By following these steps, you can determine the appropriate number and size of air purifiers needed for effective air cleaning in your space.
Efficiency Tips
Regular maintenance: Clean and replace filters as recommended by the manufacturer.
Consider wall-mounting: For space-saving and increased efficiency, consider wall-mountable models.
Monitor performance: Some advanced air purifiers offer features to measure air quality and adjust performance accordingly.
By following these air purifier placement tips, you can ensure your air purifier operates at peak efficiency, providing cleaner, healthier air throughout your home or office. Remember that the optimal placement may vary depending on your specific space and air quality needs, so don’t hesitate to experiment with different locations to find what works best for you.
Checkout the current Air Purifier Prices
Frequently Asked Questions
Q: What does an air purifier do?
A: An air purifier helps eliminate contaminants in the air, including bacteria, mold, viruses, odors, dust, pollen, and other pollutants.
Q: How does an air purifier work?
A: Air purifiers typically use a combination of technologies, including HEPA filters to trap particles, activated carbon filters to absorb odors and chemicals, UV-C light to destroy pathogens, and ionization to actively hunt down contaminants.
Q: How much space can an air purifier cover?
A: Portable air purifiers for single rooms typically cover areas up to 700 square feet effectively. Whole-house models, which are ducted into your home’s HVAC system, can cover larger areas and multiple rooms.
Q: Do air purifiers use a lot of electricity?
A: No, most air purifiers are energy-efficient. For example, some popular models use less electricity than a 45-watt light bulb.
Q: How often should I change the filters in my air purifier?
A: Filter replacement frequency varies depending on the model and air quality. It’s best to follow the manufacturer’s recommendations and change filters when the indicator light comes on to maintain optimal performance.
Q: Can one air purifier clean the air for my entire house?
A: A single portable air purifier cannot effectively clean the air for an entire house. For whole-house purification, you need a whole-house air purifier installed into your HVAC system.
Q: What is CADR and why is it important?
A: CADR stands for Clean Air Delivery Rate. It measures how quickly an air purifier can clean the air in a room. A higher CADR indicates better performance. The CADR should be at least two-thirds of the room’s area for effective purification.
Q: Can air purifiers help with allergies and asthma?
A: Yes, air purifiers can help reduce allergens and irritants in the air, potentially providing relief for allergy and asthma sufferers.
Q: Should I use both an air purifier and an air filter?
A: Yes, using both is recommended. Air filters handle larger particles, while purifiers can trap and eliminate smaller particles or make them easier for the filter to catch.
Q: Are air purifiers effective against cigarette smoke?
A: Yes, air purifiers with activated carbon filters can effectively remove cigarette smoke and its associated odors. Look for models specifically designed to tackle smoke and chemical pollutants