Why are we changing refrigerants again? As the battle against high Global Warming Potential refrigerants rages on, air conditioning manufacturers are left feeling like they’re in a never-ending game of limbo—constantly asking, how low can you go with each new refrigerant mandate. Refrigerant R454B and R32 are becoming the new darlings of the industry for smaller commercial and residential systems.
If you prefer to watch the video of this presentation, then scroll to the bottom.
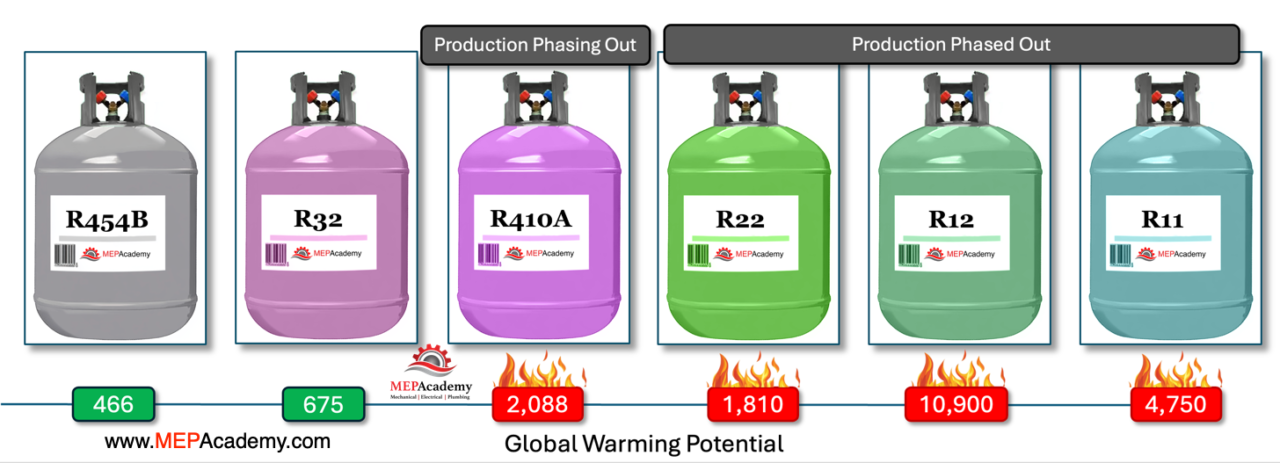
R454B has a lower Global Warming Potential than R410A. R410A is being phased out like R11, R12 and R22 were. R454B has a Global Warming Potential of 466, while R410A has a value of 2,088, which is above the new threshold of 700. The higher the value the worst the refrigerant is for the environment. R32 comes in at 675, just under the mandate.
The questions we’ll answer are, how much does R32 and R454B cost compared to other refrigerants? Will I need new tools and equipment to work with R32 and R454B? Can I use R32 or R454B as a drop-in replacement for an existing R410A, or R22 system?
Effects of Global Warming Potential on Refrigerant Cost
The cost per pound of refrigerant is influenced by its Global Warming Potential (GWP) and whether it is being phased out or has restricted production:
Refrigerants with higher GWP values are more environmentally damaging and are increasingly subject to regulatory restrictions. As regulations tighten, such as those under the Kigali Amendment to the Montreal Protocol, the demand for low-GWP refrigerants rises. This demand shift can lead to a decrease in the availability of high-GWP refrigerants, driving up their cost.
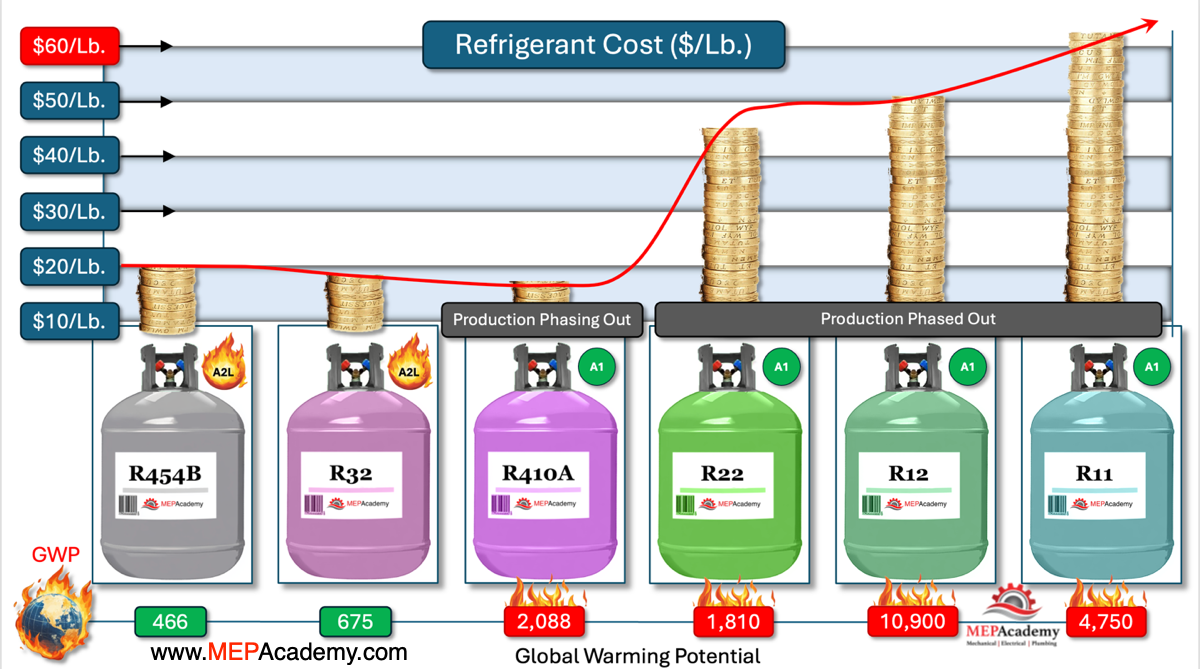
When a refrigerant is phased out or its production is restricted, as seen with R11, R12 and R22, the supply diminishes while existing systems still require the refrigerant for maintenance. This limited supply, combined with ongoing demand, results in a significant increase in cost per pound. R410A is currently available at a reasonable cost per pound but that will start to change as production decreases and other refrigerants with lower global warming potential values are produced and installed.
Refrigerants with high GWP values and those subject to phaseouts typically become more expensive over time due to increased regulatory pressure and reduced availability.
Daikin is currently a manufacturer of R32 and residential units that use R32. New R454B AC systems will become more available in 2025. The manufacturing or importing of R-410A residential and light commercial air conditioning products is prohibited starting January 1, 2025.
Your price per pound will vary based on how much refrigerant you buy from your supplier.
Can I convert an R410A System to Refrigerant R454B
R410A systems are not compatible with R454B due to differences in refrigerant characteristics, including pressure, temperature glide, and flammability. R410A is a class A1 refrigerant, while R454B is a class A2L refrigerant which is slightly more flammable. As a result, retrofitting R410A systems to use R454B is not advisable. New systems specifically designed for R454B will be required.
R410A operates at higher pressures than R454B, making the compressor and condenser less compatible with a lower pressure refrigerant. Additionally, the components in systems designed for R410A are not suitable for use with lower flammability AL2 refrigerants like R454B. Before charging the system with R454B, you must replace these components with ones that are designed to safely handle a slightly more flammable refrigerant.
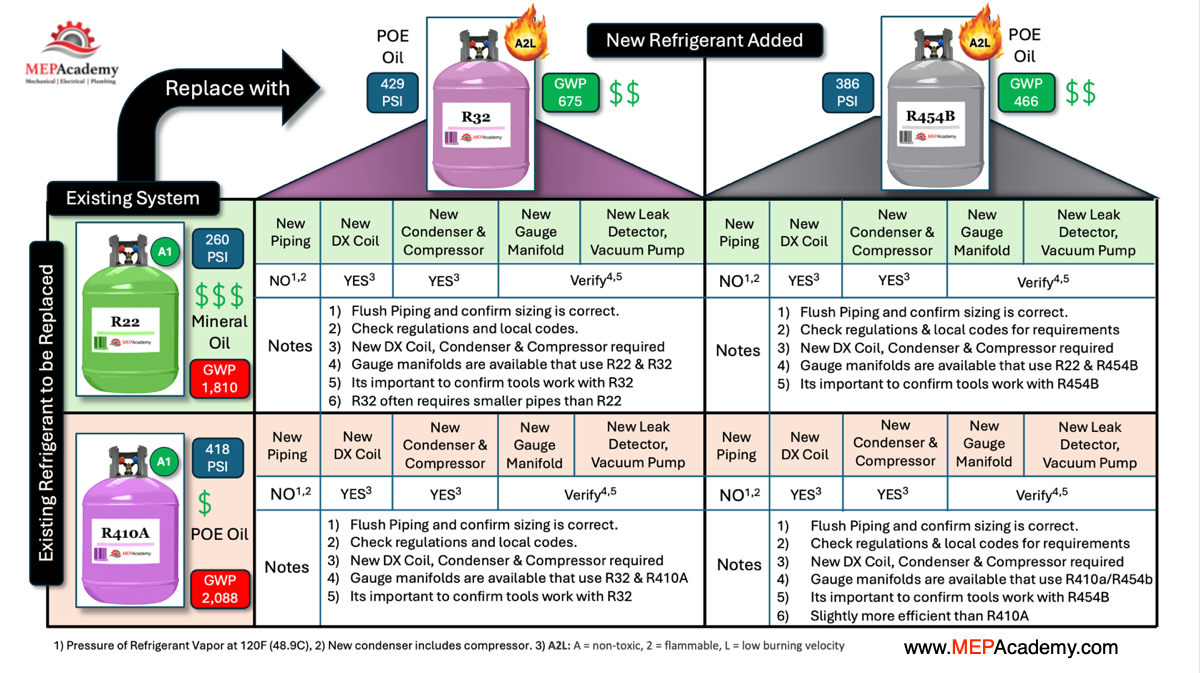
R-454B is not a drop-in replacement for R-410A or R22. While R-454B shares many characteristics with R-410A, its use is restricted by codes and regulations to systems specifically designed for it.
The same is true for R32. R32 is not a drop-in replacement for R410A or R22.
Can I use my existing tools and equipment on a R32 or R454B system?
A refrigeration technician might be able to use their existing R410A or R22 manifold gauges, leak detectors, vacuum pumps, refrigerant recovery machines, and other tools directly with the new R32 or R454B refrigerant systems. You will need to confirm with the manufacturer to see if it’s approved for multiple refrigerants. This is because R32 and R454B are classified as an A2L refrigerant. These refrigerants are mildly flammable, and may require tools that are specifically rated for use with A2L refrigerants.
We have found new gauge manifolds that are rated for all four refrigerants discussed here. It’s just a matter of buying the right equipment and tools. Never use a tool or piece of equipment that is not specifically approved for the refrigerant in question. You may have older tools that weren’t built to handle the new refrigerants, in which case you’ll need to buy new ones.
To work with R32 and R454B, technicians will need to use tools and equipment that are compatible with A2L refrigerants. This includes gauge manifolds, recovery machines, and vacuum pumps that are designed to safely handle the flammability of refrigerants that are classified as A2L refrigerants. Using the correct equipment is crucial to ensure safety and compliance with regulations when working with R32 or R454B systems.
Can I use the existing Refrigerant Piping
When changing from an R22 or R410A system to an R32 or R454B system, the refrigerant piping generally does not need to be replaced. This is provided that the existing piping is in good condition and appropriately sized for the new refrigerant. R32 often requires smaller pipes than R22.
However, it’s crucial to ensure that the existing piping is thoroughly cleaned and free of any residual oil or contaminants from the previous refrigerant. R454B, like other A2L refrigerants, requires the use of specific lubricants (such as POE oil) that are compatible with the new refrigerant. The system may need to be flushed to remove any incompatible oil or residue before charging with R454B.
Additionally, the piping should be carefully inspected for leaks and pressure-tested to ensure it can handle the operating conditions of the new refrigerant. If the existing piping is in poor condition or not properly sized, replacement may be necessary.