What is IPLV (Integrated Part Load Values)? It is based on part load chiller efficiency values. The IPLV is calculated on the weighted percentage of assumed operational hours at each operating condition. So there are four operating points that are going to be measured. This is an average efficiency of a single chiller. A lot of chiller installations will have multiple chillers. So this is a rating for a single chiller.
If you prefer to watch a video on this topic, scroll to the bottom of this page for link.
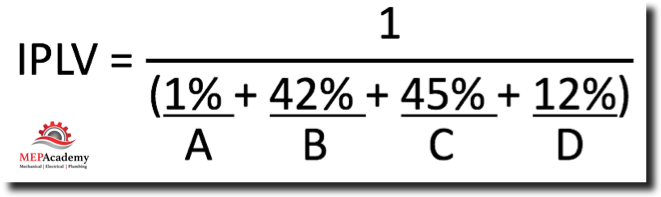
The IPLV formula is one over the four operational points that we are calling A, B, C & D. These will be the efficiency of the chiller at the different partial loads, which we’ll get into next. Were going to take condition “A” at 1%, condition “B” at 42%, condition “C” at 45%, and condition “D” 12%. This means that the chiller runs at condition a 1% of the time and 42% of the time at condition “B” and so on.
So what does “A”, “B”, “C” and “D” stand for? We are going to take these four data points for the chiller under review. Data point “A” is 1% of the chiller conditions running at 100% full capacity. The four data points are as follows:
Four Data Points Used in IPLV Calculation (EER)
“A” 1% of the time Chiller is running at 100% Capacity
“B” 42% of the time Chiller is running at 75% Capacity
“C” 45% of the time Chiller is running at 50% Capacity
“D” 12% of the time Chiller is running at 25% Capacity
These values will be put into the calculation
“A” = COP or EER at 100% Capacity
“B” = COP or EER at 75% Capacity
“C” = COP or EER at 50% Capacity
“D” = COP or EER at 25% Capacity
So, when the chiller is running at 100%, 75%, 50% and 25% we’ll put in the EER that corresponds to that datapoint.
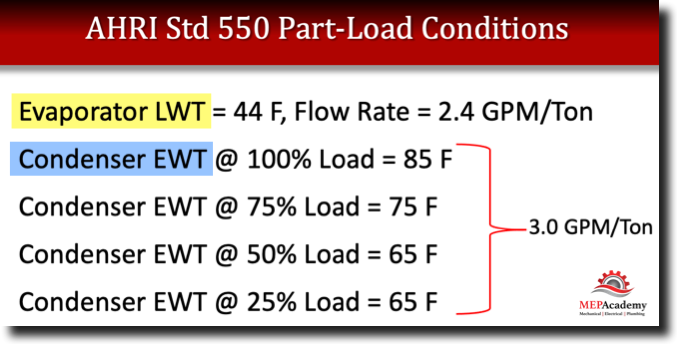
Step 1 is to determine Part-Load energy efficiency values for the chiller running at these four datapoints as discussed previously as 100%, 75%, 50% and 25% load. These operating points are the AHRI (Air Conditioning, Heating and Refrigeration Institute) standard-550 conditions. Standard-550 specifies the conditions under which these datapoints are measured.
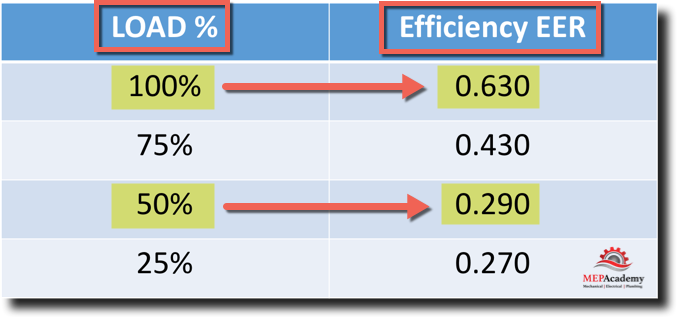
Step 2 is to insert the four data points into the IPLV formula. So now all you need is a sample of the EER for a particular Chiller that you want to analyze. We have a sample of the EER (Energy Efficiency Ratio) of a particular water-cooled chiller as shown here.
Example of Water-Cooled Chiller Efficiencies at differing Load Conditions
Based on the information obtained from the chiller manufacture as shown in the chart above, we can see that the chiller running at 100% as an EER (Energy Efficiency Ratio) of 0.63, and when running at 50% it has an EER of 0.29.
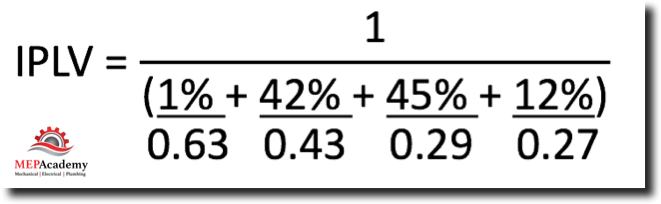
We take the information from above an insert it into our IPLV formula to derive at the IPLV number.
Chiller IPLV Formula
Remember that the chiller runs at full load only 1% of the time, so in the above example the 0.63 EER goes in the first column of the formula, followed by the EER of the chiller at 75% load and so on. You can see that the chiller has the worst EER at full load capacity and the best EER at 25% capacity. That’s why multi chiller plants may run several chillers at low load than to run one chiller at full load.
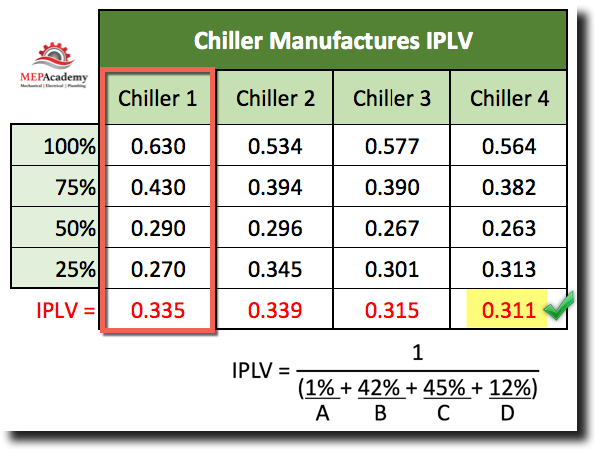
Below is a spreadsheet that we made to show various chiller manufacturers and how they compare in their total IPLV (Integrated Part Load Value).
EER Performance of 4 chiller manufacturers
You can see that the IPLV for chiller #1 comes out to be 0.335, while chiller #2 is 0.339 and the most efficient of the chillers is #4 at a IPLV of 0.311
AHRI Standard 550
AHRI (Air Conditioning, Heating and Refrigeration Institute) specifies the operating conditions under standard 550/590 that chillers are rated for as follows. According to AHRI the purpose and scope of the standard is as follows;
1.1 Purpose. The purpose of this standard is to establish for Water-chilling and Heat Pump Water-heating Packages using the vapor compression cycle: definitions; test requirements; rating requirements; minimum data requirements for Published Ratings; marking and nameplate data; conversions and calculations; nomenclature; and conformance conditions.
2.1 Scope. This standard applies to factory-made vapor compression refrigeration Water-chilling and Water-heating Packages including one or more compressors. These Water-chilling and Water-heating Packages include:
2.1.1 Water-cooled, Air-cooled, or Evaporatively-cooled Condensers
2.1.2 Water-cooled heat recovery condensers
2.1.3 Air-to-water heat pumps
2.1.4 Water-to-water heat pumps with a capacity greater or equal to 135,000 Btu/h. Water-to-water heat pumps with a capacity less than 135,000 Btu/h are covered by the latest edition of ASHRAE/ANSI/AHRI/ISO Standard 13256
AHRI Standard 550/590
You can see that the AHRI standard has the evaporator LWT (Leaving Water Temperature) at 44 F and various condenser entering water temperatures (EWT) for the various percentages of chiller loads corresponding to the four data points.
If a chiller is to run at other than AHRI Standard 550/590 conditions then its considered NPLV (Non-standard Part Load Values).
IPLV Calculation is Based on a single chiller. Data shows that 80% or more of the central plants have multiple chillers. This would then indicate that IPLV doesn’t accurately represent multi-chiller plant operating conditions. The use of energy analysis tools will provide a better solution. The use of the IPLV is used to compare unloading characteristics of similar chillers in a situation when there is only one chiller.
A chiller doesn’t run at full load most of the time. Chillers run less than full load most of the time, so this calculation is a better indicator of the chillers most likely operating efficiency.
Basically when you’re bidding a project that requires a bid bond it’s because the owner wants you to guarantee that you’re capable of fulfilling the contract requirements and that you’ll be able to secure a Performance & Payment Bond.
Usually a bid bond will roll into a performance bond.
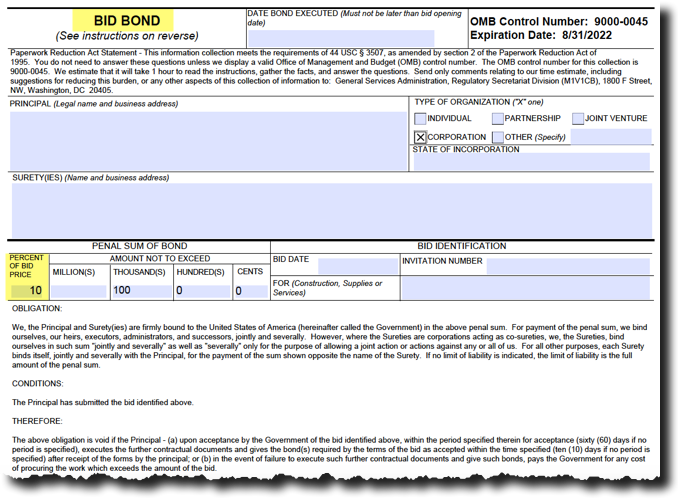
Construction Bid Bond
So, what happens if you back out of a bid where you were the successful low bidder and for which a bid bond was issued on?
If you’re the low bidder and you decide not to execute the contract and you want to backout and you provided a bid bond to bid the project. The owner will file a claim against you and your surety company.
If you’re a small company most likely you put up some form of collateral or personal guarantee. You’re personally and financially responsible for the cost difference for the owner to secure the next lowest bidder up to your bond amount.
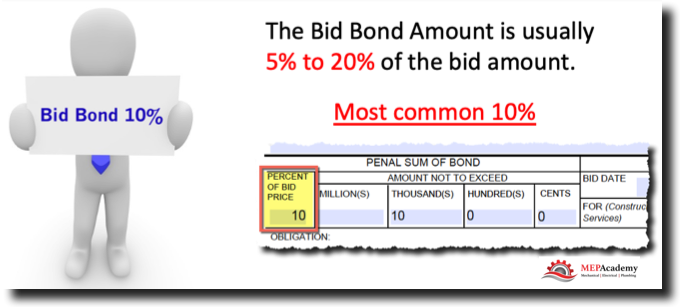
So, if you bid a $100,000 and the next lowest bidder was $110,000, and your bid bond was in the amount of 10%, your liability is the difference between your bid and the next lowest bidder, which makes you liable for the $10,000 difference if you decide not to execute the contract.
So, if you back out, you’re liable to your bond company for the claim amount plus attorney fees. So, they can come after you if you don’t pay the claim amount and the attorney fees. Read your contract to determine your liability exposure.
It’s almost better to perform the contract knowing you’re going to take a loss, at least you might be able to mitigate the loss with careful planning and great project management while hopefully there’ll be change-orders allowing you to recover some of the loss incurred on the base bid amount.
Bid bonds are usually in the range of 10%, but can vary depending on the contracting authority.
The bid bond percentage will be indicated in the bid documents.
Again, to reiterate. If you back out and you made a personal guarantee, then your personal assets could be at risk, so you want to read the fine print. You want the bond company to explain to you the terms and conditions of the bond.
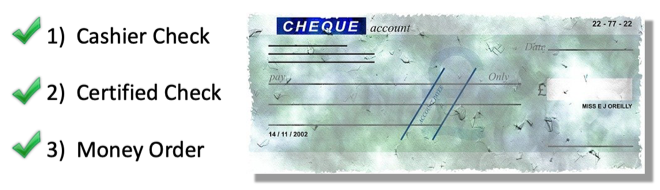
Often there will be alternatives to a bid bond, such as submitting a cashiers check, certified check or a money order, or some other asset that can make good on your promise to execute the contract if you’re low bidder. Other assets that might be considered are liquid assets, that is something that can be converted into cash easily.
Bid Bond Alternatives
When are bid bonds required?
Most likely on all your Federal, State and Local Municipality projects.
Are bid bonds required on privately held or funded projects? A lot of project are now requiring bid bonds. We’ve seen as the larger the project gets, the greater the chances there will be a requirement to bond the project.
If you are going to be bidding in the Government sector or within the larger private sector projects than you need to build up your bonding capacity. You can’t just start a company and expect a surety company to issue millions of dollars’ worth of bonds on your behalf unless you back it up with collateral and have established record of completing bonded work, and have the area of experience required to complete the proposed project.
The bonding company will also tract how much bond exposure you have outstanding. This is for any work which is currently under bond coverage, and for which is yet to be completed, releasing the bond of any further risk.
So, how much do bid bonds cost?
For projects over $400,000, the bid bond could be free. If you have a good relationship with your bond company then it’s possible there won’t be any charge. For smaller projects there may be a nominal fee of say $100. It’s possible that they have an annual fee, which covers all the bid bonds you would need for the year. Check with your bonding company to discover how they structure their fees.
Bid Bond Cost
What happens if you submit a bid without a bid bond on a project that requires a bid bond. What will they do? Your bid will definitely be rejected. They will not accept your bid, even if you are low bidder.
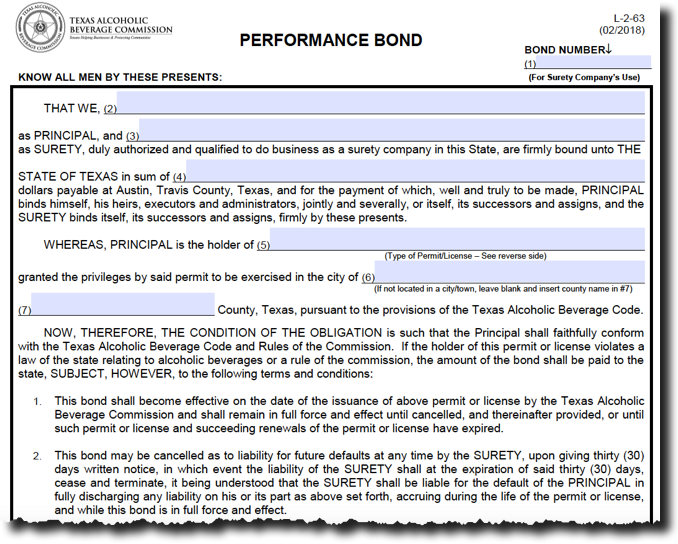
What are Performance Bonds?
They’re used to ensure the project gets completed according to the construction documents. The bid bond usually also guarantees that your surety will issue a performance bond if you’re the successful responsible low bidder. Unlike the bid bond, the performance bond will definitely cost you some money. This is where the surety company gets their money, especially if they offered you the bid bond for free. They know that following a successful bid, you’ll need to pay for the performance bond.
Construction Performance Bond
Now with a Performance bond in place, what happens if you fail to perform? You’ve gotten this far and have been executed, that is signed the contract and are now required to perform. If you don’t perform then the bonding company will pay to have the project completed. So your bonding company will either payout to the owner or General Contractor whatever it takes to finish the project that you were contractually obligated to finish. The bonding company may pay another company to finish the contract, but they make risk having to pay more than what the original bond amount was issued for.
Maybe you file bankruptcy or something. They will make your surety company pay to complete the project. You can see why the surety companies want to make sure that you have the experience and financial resources required to complete the project that you are attempting.
The penalty is usually 100% of the contract amount.
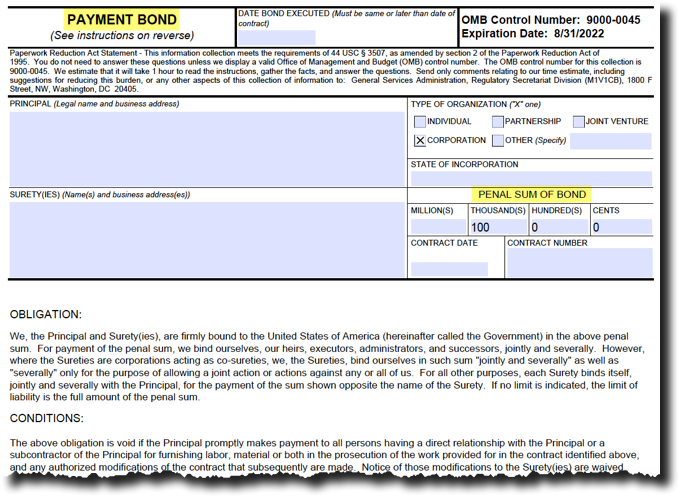
What are Payment Bonds?
The payment bond is usually coupled with the performance bond. The payment bond ensures that you pay those who provide material or labor on your behalf for the proposed project. They want to be sure that you have paid all your subcontractors, equipment and material suppliers, including all the labor used on the project that the bond was issued for.
Construction Payment Bond
How much does a Performance & Payment Bond Cost?
Performance and payment bonds are often issued as one bond except in some locales where maybe it’s just a performance bond.
Bond Rates can vary from less than 1% up to 2% or more depending on the contract amount, your experience and credit rating.
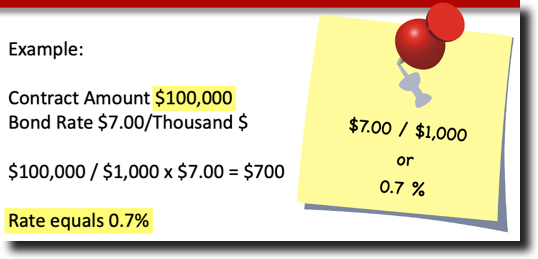
For example, let’s say that you had a construction contract in the amount of $100,000 and your bond rate was $7.00 for every $1,000 of contract. Or stated as 0.7% of the total contract amount.
Bond Cost Calculation
So your cost calculation would look like this:
Calculation #1
Take the $100,000 divided by the $1,000 to get how many thousands there are. As each $1,000 of contract amount will cost you $7.00.
$100,000 / $1,000 = 100 x $7.00 = $700
Calculation #2
Take the $100,000 times 0.7$
$100,000 x 0.7% = $700
If you are just starting out then your bond rates will most likely be higher than this amount, but as you gain experience and grow your credit your rate can eventually be lower than this. Check with your bonding company for the rate structure.
How do you Qualify for a Bond?
Small companies may be require to have the owner pledge a personal guarantee. That is the small company owner personally guarantees to reimburse the bonding company for any claims against the bond. So you really want to think this through if you are a small company and are thinking of securing a bond for a project. You want to make sure that you have all your cost covered and you have an experienced team to execute the contract documents, including the funds to pay for the project as often accounts payable will exceed accounts receivables.
So if you’re a small company its possible you’ll have to provide a personal guarantee, and if your married than your spouse might also be required to sign the guarantee. Check with your bonding company or shop around for the best terms and conditions.
Large companies usually qualify based on their credit rating and experience. So until you get some experience and establish some credit behind you, you may have to give a personal guarantee.
In summary the bonds are insurance that you will do what you said you would, and that is, to execute the contract if you are low bidder and pay all those who helped you build the project, whether that was your subcontractors, or the vendors that sold you equipment or materials, and the workers that perform labor on your behalf.
When bidding on a plan and specification project designed by a third party engineer, it’s imperative to read through the specifications for those items that will affect your normal way of constructing a project. Every contractor has a preferred way of building a project based on their own preference for materials and methods which might not line up with what the engineer has specified.
So it’s important to read the specifications thoroughly to determine where the specifications differ from your own companies standards, so that you can adjust your price accordingly.
How to Read Construction Specifications
Your company may have a preference for building their ductwork with certain seams and joints according to the equipment in the fabrication shop, or which is owned by the fabricator you purchase your ductwork from.
Knowing what to look for when reading the specifications comes from years of experience, and being familiar with the lexicon used in the trade to describe various materials and methods of construction.
An experienced estimator should be able to quickly read the pertinent sections of the specifications to discern any deviations from his company’s standard methods of construction.
Specifications can be provided in book form, electronically or printed, or they could appear only on the drawings. Either way, make sure to read them carefully.
Not everything that is found in the specifications maybe applicable to the project you are bidding, as engineers use templates for their specifications. This means that they most likely purchased a pre-written technical specification which requires them to personalize it for the particular project, but often they are lazy and the specifications are not applicable or mention systems that don’t exist on the bidding documents.
But you still must read the specifications as they will become part of the contract and you can be held to anything that is specified.
You need to record or highlight the important section of the specification for referencing during estimating review meetings or for the project manager if you are successful in winning the bid.
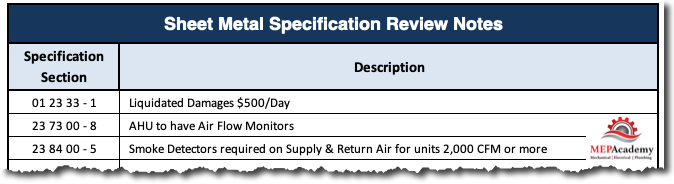
When recording the specification number onto any of the forms used for documenting, write out the full spec section description, such as: 23 73 00 – 8, 3.4 A. This identifies specification section 23 (HVAC Trade), section 73 00 (Air Handlers), – 8 (page 8), paragraph 3.4A. This will help you when you need to refer back to that section, saving you valuable time looking for the same section.
If you are using Blue Beam or Adobe Reader, then you can bookmark that page and section in the program. The idea is to record those items that differ from your standards and which will have a cost impact that you need to cover in your bid, in addition to risk factors to be aware of, risk such as liquidated damages. Liquidated damages are assessed against the contractor usually for not finishing the project on the scheduled completion date, and for each day they’re after a daily fine is assessed.
SM Specification Review Notes
Reviewing the specifications is a very important step in the process of bidding a project. The specifications will set out the requirements of the materials and equipment that you will be responsible for providing along with the methods and standards of construction. This is not a step that you can avoid.
There are methods once you become familiar with the layout of specifications, in which to save time by looking where you know the most pertinent information is located, that which has the greatest impact on cost and risk.
Specifications are assembled in three parts as defined below.
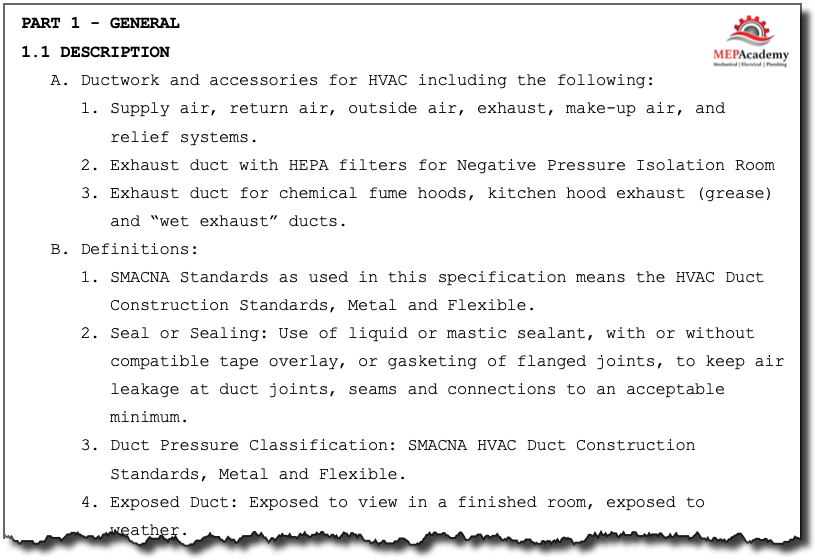
Part 1 (General)
Reading any part of the technical section of the specification will begin with part 1, the General section. The general section of the specifications usually begins by giving a description of the scope of work contained within the section of the specification. This may include a brief outline of the equipment or materials contained in that section (see spec below). The requirements for shop drawings or submittals could also be stated in this section. It might also list related work in other sections of the specifications.
Specification Section General
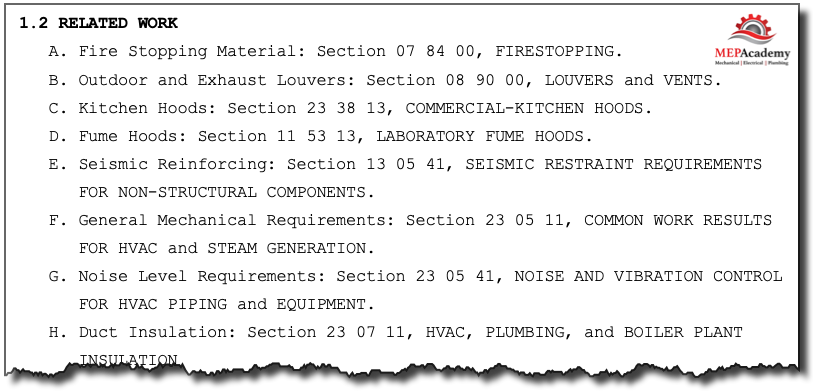
Section 1.2 Related Work
In part 1 of the general section of the specifications you will find section 1.2 “Related Work”. This portion covers other areas of the specifications that have related sections, some of which will be within your scope of work and others within other trades that isn’t part of your scope but needs coordination.
Specs General Section Related Work
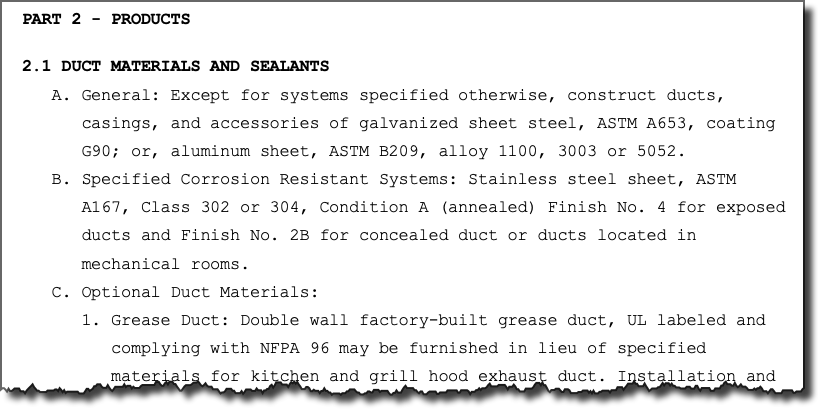
Part 2 Products
In part 2 will be the description of the technical requirements of the equipment or material. The performance, ratings and criteria that must be net if a substitute piece of equipment will be allowed. The equipment or material could be referred to by manufacture and model number, or generically described. Acceptable manufactures could be listed, those other than the one on the equipment schedule.
Part 2 of Specifications
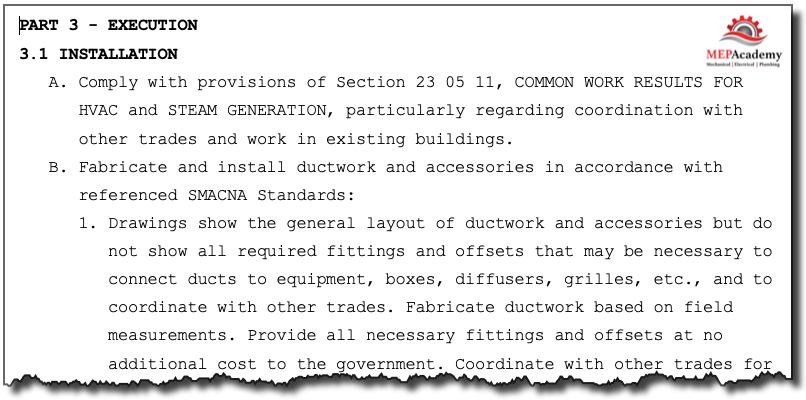
Part 3 Execution
Part 3 is the last part of the specifications and it describes the methods and quality of construction required. It could mention the start and test requirements for a boiler or that the equipment being installed has to be installed according to manufacture suggested methods of installation. It could mention the requirements of adjusting and cleaning of the equipment.
Part 3 Specs Execution
SMACNA Standards
The areas of concern for the sheet metal trade will be the construction standards specified for the air ducts and accessories. You will need to know the thickness of the material required for the various sizes of duct, and what type of seam and joint is mandated.
Often the specifications will cite SMACNA as the construction standard to follow when fabricating and installing the ductwork and accessories. SMACNA is the industry trade association that publishes construction standards in addition to other works related to the industry.
Construction Specifications Institute
Specifications are broken down by sections that correspond to the different trades. The Construction Specifications Institute (CSI) puts out specification division definitions that classify various trades into easily identifiable numbered sections and subsections.
For example under their earlier version there were 16 divisions and the Mechanical Division was specification section number 15. The format was updated to now include 50 classifications of specification sections. Now division 23 is where you will find the specifications for “Heating Ventilating and Air Conditioning” and division 25 for “Integrated Automation”, the specification section for controls. Under division 23 is where you will find the HVAC sheet metal specifications.
Division 23 Heating, Ventilating and Air Conditioning
Within division 23 of the CSI specifications you will find the sheet metal section of the specifications where the information related to the allowable materials and methods can be found. Here are some of the important items to look for in that section of the specifications.
Which duct seams and joints are allowed for round and rectangular ductwork?
Are adjustable elbows allowed on round duct or is a more expensive type required?
Material and gauge of metal required per duct pressure class or system.
What are the hanger requirements, for both the upper and lower attachments?
What are the requirements for thermal or acoustical lining of ductwork?
Type of volume dampers
Are remote damper operators required above inaccessible ceilings?
Is temporary HVAC equipment required, if doing a renovation project?
Duct pressure testing requirements
Duct mounted smoke detectors. Who provides and installs.
Is cleaning of the ductwork required? SMACNA has three levels of cleanliness.
Are cost breakouts or unit pricing required?
Specifications
What you are looking for in the specifications is for those items that have a cost impact and for the construction requirements that deviate from your company standards of construction.
In addition to the Division 23, it’s imperative that you determine if some of these other project requirements are listed under “General Conditions” of the specifications or are located in the projects frontend documents.
General Conditions
Liquidated Damages. This is a clause inserted into the construction contract that provides for a penalty, usually a stated amount per day for not meeting some aspect of the terms, such as the completion date. ($500/Day)
Project Schedule. The duration of the project is important when considering how much labor it will take to get the project completed within the scheduled allotted time frame. If the project schedule is too short, then you may need to work overtime in order to complete it on time. If the project schedule is for an extended period of time, you might have additional general condition cost, such as jobsite offices and rental equipment.
Bonding. Check to see if a performance and payment bond is required. These add cost to your bid, as your insurer will charge a fee to issue these if you are the successful bidder. These bonds ensure the owner that you will pay your bills to those who provide material and labor for company on behalf of this project and that you perform according to the contract. For large companies this cost will be less than 1% of the total cost of your portion of the construction, and for smaller companies this would most likely be greater than 1%.
Risk Management
Reading the specifications, RFP (Request for Proposal) or other documents related to the bidding of a project, the goal is to identify areas of risk. Once you identify those items of risk, then you can either mitigate, avoid or manage the risk with the foreknowledge of risk identification. Early risk identification is smart business practice as opposed to being surprised during construction that a certain risk wasn’t identified and now has to be dealt with.
Additional Personnel
There are some projects that will mandate that certain types of personnel be part of the construction team. These could include the requirement to have a full time supervisor, safety manager or Quality Control Expert. Read carefully through the project personnel requirements and whether they need to be full-time.
Listed Manufacture or Equal
Most engineered projects are designed around a certain equipment manufacture as indicated by the make and model number indicated on the equipment schedule. When reading the specifications you will be looking for the “or Equal” reference where the list of approved manufactures are listed.
Specification Review Checklist
You should have a standard checklist that includes the most common items to look for when reviewing the specifications. The checklist provides a convenient reminder of those items that typically can be found to have a cost impact. Record the specification section and page number for quick reference.
Sheet Metal Specification Review Checklist found in the MEP Academy Estimating Spreadsheet
Introduction to Sheet Metal Estimating (Free Course)
If you are looking for Construction Estimating Software, the choices are many. I have personally been involved in overseeing an estimating group of 20 plus estimators and can tell you there was no way we could have bid the number of projects without using some form of mechanical Estimating software. Depending on your budget and sophistication with software there are lot’s of choices, but here are some of my thoughts if you are interested in purchasing a program. I will cover the usual cost encountered which vary per vendor, and then we’ll cover the features that you should ask about. You will also find a free Construction Estimating Software Checklist on our website at www.MEPAcademy.com that you should use when evaluating a purchase.
If you prefer to watch the YouTube version of this presentation then scroll to the bottom or click on this link. Best Mechanical Estimating Software.
Construction Estimating Software ranges in price, which usually correspond to the features and the popularity of the program. Expect to pay anywhere from $1,500 and up for a basic license, but they are worth it, if you plan on bidding a lot of work. The latest trend in software is the subscription model, where you pay an annual fee to use the license. The fee would include technical support and any other options would be an additional charge, like training.
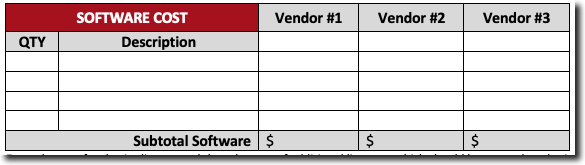
Estimating Software Cost Checklist
The more licenses you buy the better the discount. Of course you can get simple add-ons for Excel for much less but they won’t have the Features & Onscreen capabilities of the estimating programs covered here. There are additional fess as described further in this article.
Software Licensing Fee
The first cost is the cost of a software license for each trade, such as a separate fee for Sheet Metal and another cost for a Plumbing/Piping combination license. Additional licenses after the first one should be at a reduced cost. The combination Plumbing/HVAC Piping is a single license and is sometimes slightly higher than the sheet metal license.
The fee covers the right to use the software according to the terms of the license. Cost to purchase a single license range from a few thousand to upwards of $7,000 for a combo license that includes Piping/Plumbing & Sheet Metal, and for an annual subscription the cost ranges from $1,900 to $3,000 per year, there are some that provide a monthly lease agreement.
Labor Database – fee
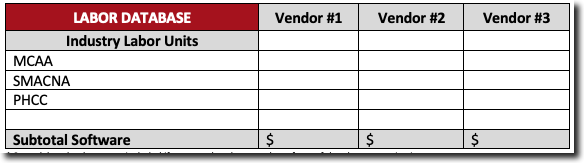
Most construction estimating programs can use industry standard labor units published by MCAA (Mechanical Contractors Association of America), PHCC (Plumbing, Heating & Cooling Contractors Association), or SMACNA (Sheet Metal & Air Conditioning Contractors National Association). The database will give you unit labor values for each item and the total labor required for the project based on their published assumptions.
You’ll need to know how your site conditions differ from their standard assumptions and from your own historical database of productivity for a similar situation and project. You will make labor adjustments like you have in the past based on experience, such as Linear Feet per Man Day or a factor of the database values. This is a topic that requires its own article, as there are many aspects to adjusting labor. See our article on Adjusting Field Labor.
Labor Database Cost Add
Remember that if you are a member of one of these organizations then there is probably no cost for the labor units, and if you’re not a member make sure to verify whether the price you are paying for the software includes these labor databases as they are considered proprietary information available by license only.
If you plan on using your labor units then this may not be an issue, but it is easier to start with one of these organizations database as they contain thousands of labor units based on industry surveys. The labor databases may cost you in the range of $200 to $1,000 for all three mechanical trades.
Material Pricing Database / Pricing Service – Fee
You will need to pay an annual reoccurring fee for a pricing service, like Harrison Publishing, Trade Service (Tra-ser), or Allpriser (Canada) which provides retail list prices of most major manufactures of pipe, valves and fittings. These companies charge an annual fee, but it is worth it if you do a lot of bidding. The alternative is to get pricing on each bid which is cumbersome and slow if you bid a lot of projects.
Most programs sold in Northern America come with a pricing update service and contain over 70,000 prices for pipe, valves and fittings. Whether it’s the Euro, Yen or Dollar the cost of commodities are constantly changing and you need to have a pricing method to stay current, and there is no easier method then a pricing service company. You will be notified when the next price update is available and you’ll download it automatically from the internet. This fee varies by vendor but expect a range of $300 to $1,400 per year.
Material Cost Database (Annual Fee)
You’ll need to put your discount multipliers for each manufacturer into the program so that you get net prices for your HVAC piping and plumbing materials, as the material database will be based on list prices. Whoever does your purchasing will know these discount values.
For sheet metal you’ll most likely need to manually enter the purchase price for round and rectangular ducts and fittings. If you fabricate your own duct work, then databases from SMACNA will have the labor units but you will still need to add the cost of materials.
Software Training Fee
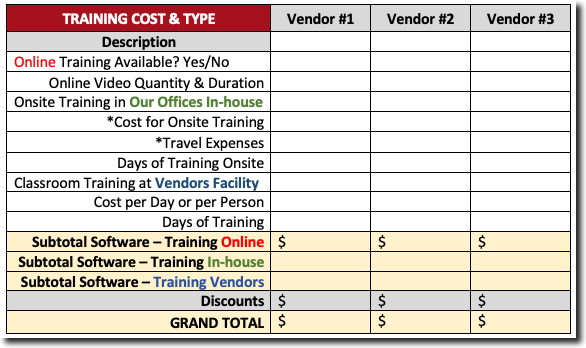
Be sure to find out how much training will cost as this varies greatly from vendor to vendor and could be free if you use the internet. Some software providers will come to your facility or invite you to their training facility. You must analyze whether it is more feasible to travel your estimators to their facility or pay for them to come to your office to do the training. The best option is to have training done remotely using the internet, as this saves on travel cost.
If you have training at your office you will need to pay for the trainer’s travel cost which usually includes flight, hotel, car rental and a daily food allowance. But if the training is in your office you can usually have as many of your employees attend without any additional fees.
Estimating Software Training Cost
Be sure to find out the cost per person and per trade for those that do multiple trades. Some vendors provide unlimited training, so be sure to inquire about this very important aspect of your purchase.
The fees for training depend a lot on which training method that you implement, for web based training expect to pay up to $1,000 per estimator. For training in their facility you should expect a range from $1,000 to $2,500 per estimator, and for training at your facility expect to pay in a range of $3,000 to $7,000 including the trainers travel expenses.
Technical Support and Maintenance Fees
Most construction estimating software vendors have some form of technical support for their program and it is usually included in your annual subscription or maintenance fee. This fee is for any upgrades that might occur during the year and for technical support that you may require.
Technical Support
If you choose not to pay for the annual maintenance and support fee, then check to see if they have an hourly rate for when you might need support. This is an annual reoccurring expense that is based on the quantity of licenses that you purchase, also check to see if the first year is included in your software cost, either way you want to know what your cost will be for each year after the first. If you buy a subscription, then support and upgrades are usually included.
Estimating Software Annual Fee
From our experience this fee varies greatly by vendor and is based on how many licenses you initially purchase, and can range from 5% to 15% of the license fee. The fee is more towards the lower end of the range the more licenses you own, hence the more negotiating power you have. Make sure to renegotiate this fee if your company grows and you add more licenses.
Total Software Cost Summary
The total cost for the construction estimating software will be composed of at least the following minimum cost range (Remember this is the most versatile of the estimating software the industry currently has, and there are less expensive alternatives with fewer features);
Purchasing Software – Licensing Fee ($2,000 – $10,000 per License/Trade)
Software Subscription – ($1,500 – $2,000)
Labor Database Fee ($200 – $1,000)
Material Pricing Database Fee (Annual Fee $300 – $1,400)
Training Fee (free – $7,000)
Technical Support Fee (annual fee of 5% – 15% of license fee)
Features
CAD/BIM Integration
CAD Computerized Aided Drafting
One of the biggest benefits for those who have a detailing department, is the integration with various CAD programs and shop fabrication equipment.
This allows you to share one database which guarantees consistency from estimating to detailing to fabrication. This makes for a huge labor savings because when the detailing department finishes laying out the project, the CAD software program can export a file that can be imported into the construction estimating software program which will execute an estimate without any time spent doing a takeoff.
Ask if this feature is available with the construction estimating software and which CAD/BIM programs its compatible with.
Shop Fabrication Integration
Plasma Cutter
There are many construction estimating software programs that now integrate with shop fabrication equipment, especially for sheet metal.
The program shares an integrated database that keeps consistency between the estimating and detailing departments, and the fabrication shop.
The program would allow the estimating takeoff to be downloaded to the shop equipment for direct fabrication. In most cases you would want this to come from your detailing department to make sure what you fabricate will actually fit in the space allocated on site. Ask your software vendor what fabrication equipment if any the program is compatible with.
One of the great benefits of estimating software is its ability to provide equipment connections of various sizes quickly and with updated pricing. An assembly is all the pipe, valves and fittings around a piece of equipment or fixture.
For example, a Chiller or Pump often requires the same pipe, valves and fittings whenever one is installed, so why repeat taking off the same bill of materials when an assembly in the construction estimating software can retain all those parts for you. All you do is ask for a chiller connection of a particular size and the software calculates the bill of materials with the latest up to date pricing and includes all the material cost and labor for those parts.
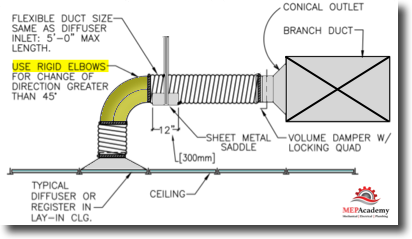
The same for a typical diffuser connection as shown above. On a large project you could have hundreds of these connections. By having an assembly built, you’ll save time not having to re-enter the same lines repeatedly. The same applies to plumbing fixtures.
Ask your vendor how many pre-built assemblies come with the program. You can also build your own or modify the existing assemblies to the way you trim equipment or fixtures.
Estimating Reports and Spreadsheets
Computer Reports and Spreadsheets
The estimating software can run many different reports, from material and labor summaries to the isolation of separate zones or alternates for review. The important thing is that if you have a special way of reviewing material and labor summaries and breakdowns, you’ll need the program to issue reports in the format you need for analysis.
It’s important to make sure that the software can give you reports the way you desire. You can pay to have the estimating software vendors make custom reports for you the way your company likes to see them, if the reports don’t give you what you want..
Most of the estimating software programs also come with an estimating spreadsheet for the summation of the information coming from the database from within the software, and for which you will add additional pricing to comprise a total bid.
To the spreadsheet you will add subcontractor pricing, equipment and specialty items not included in your estimating software. The estimating software might also export data that you would then import into another program like Excel. Ask about the versatility of the reporting capabilities.
Some of the estimating programs can export the information from the estimating software program directly into your company’s template proposal application like MS Word. Along with project information there is also the insertion of charts and estimating data.
Sheet Metal – Construction Standards
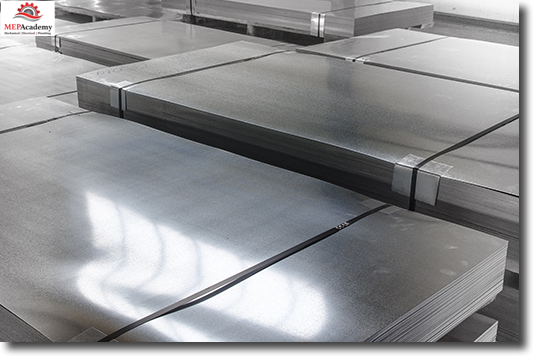
Sheet Metal Material – Flat Stock
Contained in the sheet metal estimating program should be construction standards for rectangular, round, and oval duct based on SMACNA construction standards. In addition to standard galvanized duct and fittings, there will be the option to use other materials like stainless steel, black iron and aluminum.
Part of your implementation time will be spent setting up these standards according to the way you fabricate ductwork. The system should at least come setup with static pressure classes from minus two (-2) to positive six (+6) inches of static pressure.
The construction estimating program should contain the capability to either enter shop fabrication data or the cost to purchase your rectangular duct from a fabrication shop if you don’t have your own shop.
HVAC Piping – Construction Standards
Piping Construction Standards
The database will contain different materials and methods of joining pipe and fittings together, from soldered, brazed, welded, grooved, pressed and push joints.
Estimating software programs contain many different piping material types that can be combined in various size breaks, such as using copper up to 2” and carbon steel from 2-1/2” and up, all setup under one system, such as Chilled Water, Heating Hot Water or Condenser Water.
The question to ask is how many systems come pre-setup and which ones? If you use various other types of materials like Polypro or Press-fit type fittings, be sure to ask if they are available in the database. Often if they haven’t been setup already this will create extra time to implement the system for the type of materials you commonly use.
Plumbing – Construction Standards
The mechanical estimating software will also have many piping materials that can be combined to comprise the required systems for plumbing, such as copper, cast iron, plastics, ABS and others. The same questions apply here as for the HVAC piping construction standards above.
Automatic Generation of Fittings, Hangers and Joints
Forget about counting hangers as the software will automatically provide hangers according to the hanger spacing set in the construction standards. All you need to do most often is to indicate what the upper attachment will be fasten to, such as concrete, wood or steel beams.
Another great feature is the automation of fittings and joints including all the parts that comprise a joint. No more worrying about or having to remember what is required each time you make a fitting or joint connection.
Once your setup, or confirm that the database holds the correct information for the materials you use on your standard fittings and joints, the system will provide a hanger per the hanger schedule in the software, and all the required components surrounding an elbow, tee, joint or connection without you having to tell the system where the fitting is or the parts needed. This makes for extremely fast take-offs because there is no need to take-off each individual fitting. Ask your mechanical estimating software vendor if this feature is available.
Onscreen capabilities allow you to do takeoffs directly from digital plans on your computer screen, reducing the time and cost of printing and manually marking paper copies. The On-Screen digitizer supports a wide variety of popular CAD formats in addition to the following; PDF, JPEG, TIF, GIF, PNG and many others. Here is the Trimble AutoBid Mechanical for taking of HVAC piping. It will give you an idea of how Onscreen takeoff works for the other mechanical trades and estimating software vendors.
Check with your vendor to make sure the program accepts your file types. The program should allow real time panning, zooming and marking of very large CAD drawings while minimizing the impact on the computer’s performance. On-screen takeoffs have moved away from the use of digitizers or computerized tabletops.
Specification Swapping
Having this feature allows you to switch the specification of your takeoff with another specification type without having to input each item into the system over again. For instance, if you took off everything as being copper, then using this feature you could just swap out the copper construction specifications with any other specification, like black iron, carbon steel, or some form of plastic.
Mobile/iPad Option
Mobile Apps
Some of these mechanical estimating software companies offer mobile applications that are compatible with their main program. This allows you to do a field takeoff and then import a file into the main estimating program back at the office. Ask about this feature and its cost and capabilities.
They may integrate with Apples iPad or an Android, be sure to ask.
Comparing Drawings
When you receive changes to the drawings that you have already done a takeoff on, this feature allows the software to compare the two drawings and highlight or indicate the differences. This saves time when addressing addendums and change-orders.
Documentation
Documentation
This is one area where you may find that some of them are lacking, as it takes considerable effort to put together and keep updated documentation on the functionality of the mechanical estimating software.
Many vendors now have videos online and don’t provide any written documentation. Be sure to ask about the type and amount of documentation available. Having the ability to refer to training videos or documentation is helpful when you want to learn more about the programs capabilities or just for troubleshooting a simple problem before calling technical support.
Accounting Integration
Some construction estimating software programs have the capability to export data to various accounting software programs. This is useful if you want to save time in setting up a project for the construction department for labor and material tracking. Having the ability to export all the material and labor values from your estimating program broken down by zone, floor or system type is a convenient and fast way to transition a successful project from estimating to operations quickly.
It’s important to make sure that your accounting software is on the estimating software’s list of compatible programs if this is important for your company. Its possible also that the estimating software can export into Excel or a commonly used format like CSV or an ODBC Compliant file.
Project Scheduling Integration
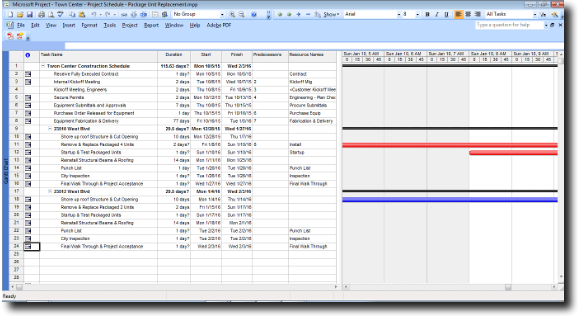
Project Scheduling Integration
Again another feature that can be useful if you want to export data into other programs, in this case scheduling software like MS Project. This is another time saving feature that is beneficial for those that provide construction project schedules in the various scheduling programs available.
Network based or Standalone based License
Network License or Standalone
Licensing comes in various forms for the different methods of your company’s IT setup and estimating accessibility requirements. If there is just one estimator, then the question comes down to whether you want the program to reside on a network server or the Cloud which is accessible from many locations or if the program will reside on your laptop or desktop and be accessible to just yourself (Stand alone).
Often with a Network based installation it doesn’t cost anymore if you have one or ten estimators connected to the network software license, because the cost is for the quantity of licenses, not the quantity of estimators. If you have four estimators and only one license, then only one estimator can use the software at a time, and you only pay for one license. You must evaluate how often the estimating software will be used and for which trades.
A lot of programs are now cloud based, where most of the software resides on servers that are housed in some remote offsite facility. You’ll have a license portal that will confirm you have a valid paid for license before being granted access to the remote server.
Technical Requirements
Be sure to verify that your current computer has the required specifications to handle the requirements of the construction estimating software program. With the increased functionality and graphics used with some of these programs you want to make sure that your computer can keep up, especially if you are using a network license with many users in different locations.
If using a network and you have users in different cities or locations all using the same server to retrieve the Estimating Program, be sure you have the band width to handle the data transfer required. Make sure to ask all the pertinent questions before purchasing any construction estimating software. The software vendor will have a technical requirement spec sheet for computers to meet.
Implementation of the Program
It takes considerable effort to get the program setup to match your company’s way of doing business. Most programs come setup with the basic construction standards, but if yours differ you’ll need to spend time implementing changes to match your company’s’ way of building projects. Whether you do sheet metal, HVAC piping or plumbing, there are construction standards that come prepackaged with most software programs.
Often SMACNA standards or something similar for sheet metal fabrication will come preset and will need to be adjusted for any local code variances in joints, seams, gages or reinforcement. HVAC piping and plumbing will have copper, cast iron no-hub, plastic, carbon steel and refrigeration piping already setup, but once again you must confirm that it is the same as your company’s construction standards and the local code authority.
There is also the time required to enter pricing data for the sheet metal and piping/plumbing discount multipliers.
Make sure to allow time for implementation. My experience is that most construction estimating software vendors understate the amount of time it takes to implement their programs, so I would expect anywhere from 2 to 8 weeks depending on how many systems you need and how close your company standards are to the boxed standards that come with the mechanical estimating software program.
Estimator Experience
Do you or your estimator have any experience using construction estimating software? Training will be required in the range of 3 to 5 days. Beyond this you will need to invest time implementing and learning the nuances of the program to become efficient at take-offs including time to maintain the database. Anyone that has the basic understanding of computers will learn quickly how to do takeoffs, and someone who understands construction standards will be required as administrator for implementation and liaison with technical support staff.
Estimating Software Checklist
Use the enclosed 6-page Estimating Software Checklist to compare the various estimating software programs and to make sure you ask the right questions. See below for download link for free Estimating Software Checklist before investing in software.
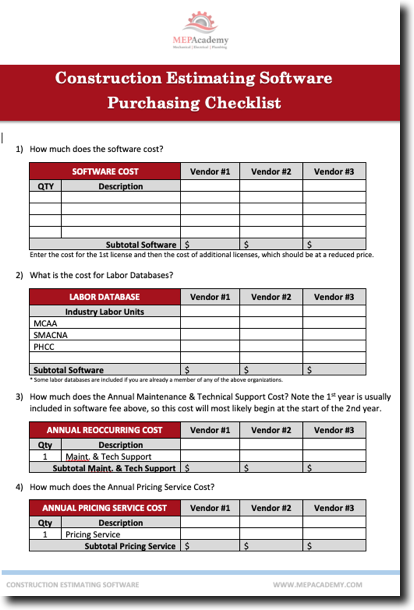
Construction Estimating Software Checklist
Estimating Software Demonstration
FREE Construction Estimating Software Demonstrations
We recommend that you get a FREE demonstration of the various software programs so you can evaluate your needs against the available features and cost of the different construction estimating software programs.
Estimating Software Vendors
FastDuct
FastDUCT Estimating Software
Software Buying Checklist
For a complete Checklist of the Questions you should be asking any construction estimating software vendor visit the www.MEPAcademy.com for a FREE copy. Look for the download link at the bottom left of the below document screen.
Using estimating software makes your life easier, but there is an investment of time and money to get it implemented and keep it going. Discover the advantages with a FREE demonstration.
Introduction to Sheet Metal Estimating (Free Course)