


Water Coils Explained. In this presentation we’ll learn how coils are constructed and how to select coils for optimizing energy and performance. We’ll learn all the parts of the coil assembly so that you can discuss coils with anyone including engineers. We’ll look at Chilled water and Heating Hot Water coils. Coils can be found in Air Handling Units, Fan Coils, VAV Boxes and Induction coils to name a few.
If you prefer the YouTube Video of this presentation then scroll to the bottom or clink on this link. Water Coils Explained.
Coils are used to transfer heat between two mediums, often water and air. Air passes over a coil and the water passing through the coil either absorbing or giving up its heat. The greater the temperature differential between the air and water, the greater the potential heat transfer.
Coils can be installed with just one or multiple coils in a stacked or side by side configuration within HVAC equipment or as part of a built-up system. Built-up systems are used on large projects and require special structural supports to hold them in place.
First we’ll cover coil construction. Most coils used in the HVAC industry are constructed using copper tubing ranging in size from 5/16” up to 1” O.D. You may find 5/8” to be the most commonly used size. The tubes go back and forth from one end and back again, each time they go up and back that is considered 2 passes, as the coil has traversed the face of the coil twice.
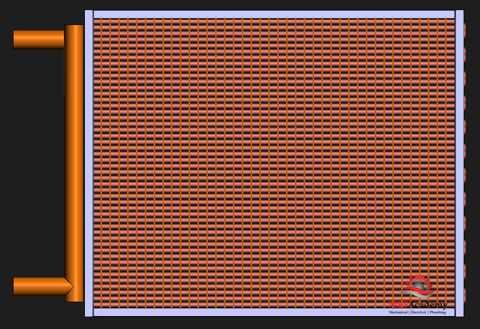
Rows of Coils
The tubing can have anywhere from 1 row of coils which is common in small VAV Boxes using reheat coils, all the way up to 12 row coils for larger chilled water systems.
By adding additional rows to a coil, you can increase the heat transfer capabilities if the fins per inch remain constant. But by increasing the number of rows in a coil, the pressure drop across that coil will increase also, causing the fan to work harder, we’ll discuss more about this later.
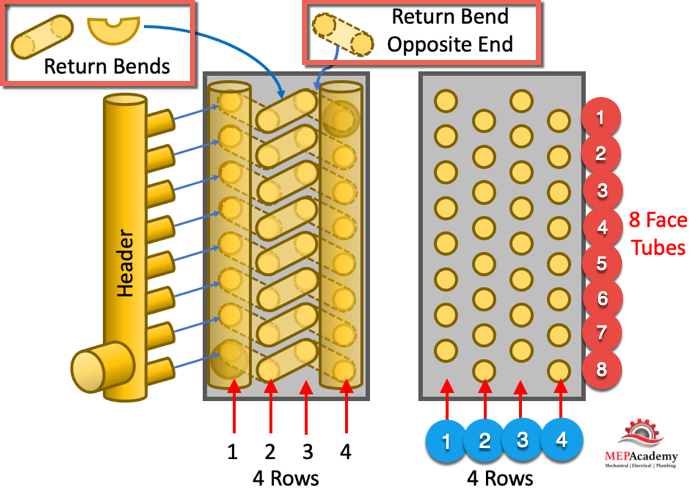
To count the rows of coils there are several methods, first look at the end of the coil without the header and count the return bends or hairpins. The hairpins are 180-degree fittings that turn the flow back into the coil. Each hairpin accounts for two rows if aligned horizontally, so if you have two hairpin turns horizontally aligned, then you have a 4-row coil. If looking at the header, there would be one row for each header, which isn’t visible when looking directly at the end.
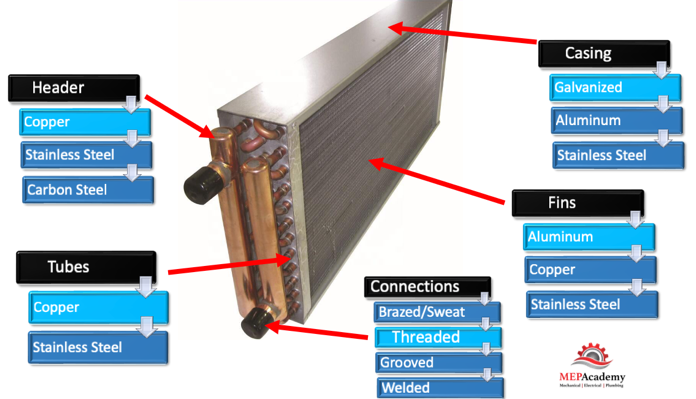
The coil will be housed in a casing often constructed of galvanized sheet metal. Coil casing material can be galvanized steel, carbon steel, stainless steel, copper, or aluminum. Typical casing thickness for galvanized steel is 16 or 14 gauge. The casing is the structural support frame that holds the tubing.
Coil Fins
The coil tubing is covered with fins which increase the heat transfer surface to improve energy transfer from the air to the water in the coil.
In the HVAC industry coil fins are customarily made using aluminum, but are also available in copper, and in restricted sizes for stainless steel and carbon steel. The fins surface area increases the contact area of the air passing through the coil. This increases the efficiency of the coil. The thickness of the aluminum fin material is very thin and can range from 0.0045 to 0.016”.
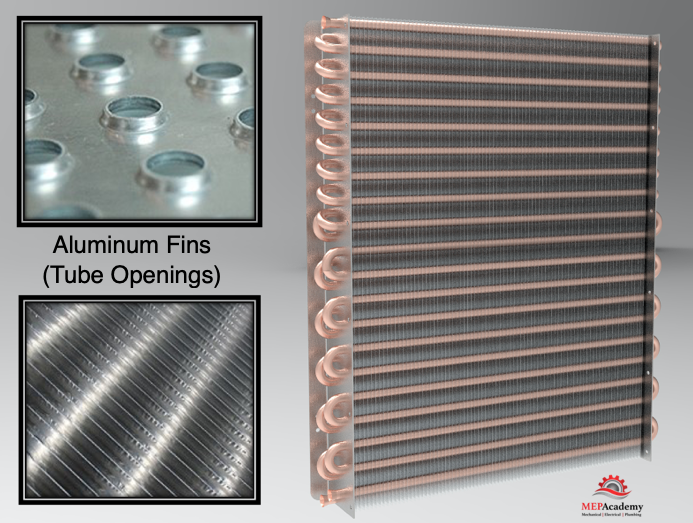
The tubing slides through the openings in stamped sheets of metal that comprises the fins, acting as a guide. The fins are spaced close to one another, and the quantity is referred to as the fins per inch (FPI), or fins per foot (FPF). Coils can be provided with anywhere from 4 to 20 fins per inch.
Remember the increased surface area, meaning more fins per inch, or more rows will increase the heat transfer capabilities but at the cost of fan energy. Coil manufactures software will pick the best coil, with the least number of rows to meet the project requirements.
The fins are provided in various patterns and configurations. The fins are attached by forcing a mandrel through the copper tubing, causing the tubing to expand and tighten against the fins.
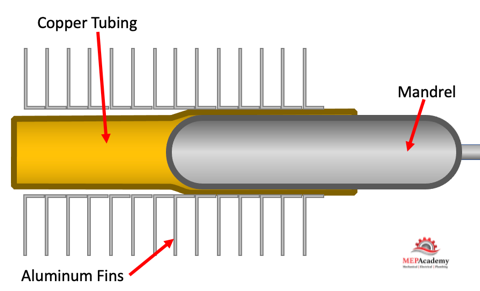
This ensures a good bond between the tubing and the fin which creates good thermal conductance for heat transfer.
The fins surrounding the coils can be configured in various shapes from flat to corrugated.
Right-Handed or Left-Handed Coils
Coils are considered left-handed or right-handed. The reason this is important is that when the coil is installed you want to make sure that the piping connections to the coil are on the correct side of the equipment to avoid extra piping.
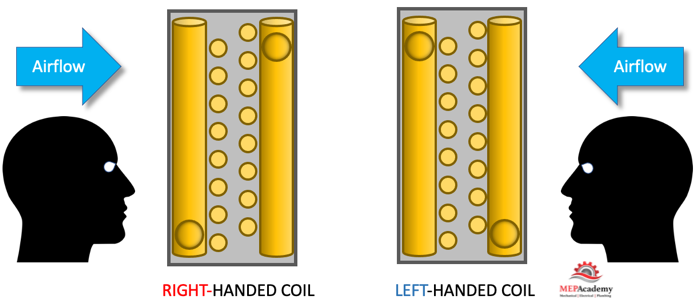
This can be determined by standing in front of the coil looking in the direction of the airflow, with the air at your back. If the connection is on your right, then it’s considered a right-handed coil connection, and if it’s on the left, than its left-handed.
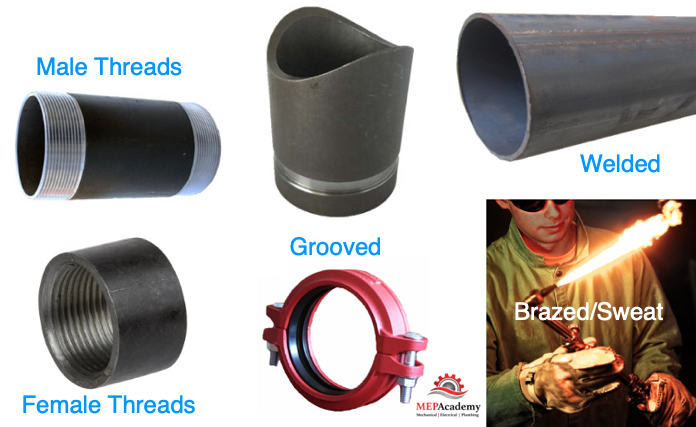
Coil Headers
Headers are provided for the supply and return connections to the coil which can be provided in materials such as copper, carbon steel, stainless steel, and red brass. Piping connections can be provided in both male or female threads, grooved, welded, or brazed/sweat. Male threaded connections are common up to 2-1/2”.
The header serves several purposes, one is to provide a method to connect all the individual tubes in the coil to one larger pipe, that can then be used to connect the system piping to one or more inlet and outlet connections. The header allows the water to be distributed to the smaller connecting tubes.
The term coil passes refers to the number of times water traverses from one end of the coil to the other, starting at the inlet. Going up and back would be one round trip and considered a 2-pass coil, once across and then the second pass would be returning.
The face area is considered that portion of the coil which air passes through. This would exclude the casing area. To calculate the face area of a coil you would measure the height and length from the inside of the coil casing. This is the area that the air travels across and is often referenced by the square feet of face area.
Coil Circuiting
Circuiting refers to the path of travel from when the water enters the coil until it leaves the coil. Starting where the tube or circuit attaches to the supply header and then travels back and forth through the coil until it attaches to the return header is considered a circuit.
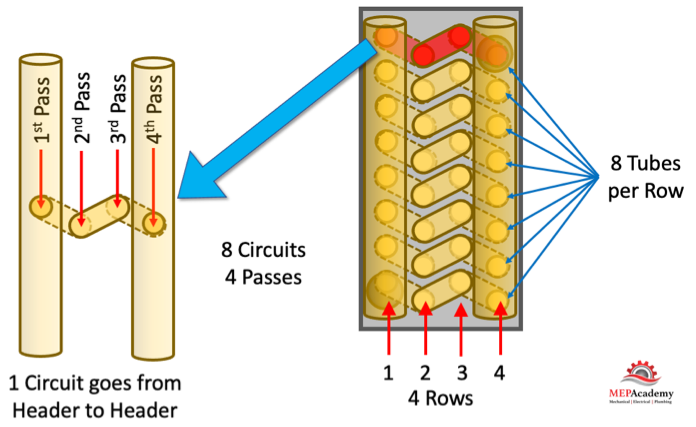
The longer the path for the water, the greater the pressure drop and the lower the flow rate, which gives the water more time to absorb or reject heat to the air blown over the coil.
Coil Air velocity
The air velocity over the coil will affect the size of the coil and the HVAC equipment cabinet that the coil is installed in. The slower the velocity, the larger the coil and cabinet that houses the coil. The reason for slower velocities might be for energy savings by reducing fan size, but there will be a slight offset in additional pump and chiller energy.
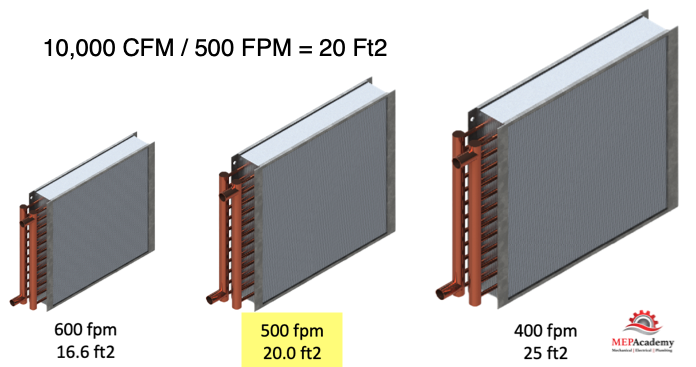
The air velocity is indicated in feet per minute (FPM) across the face area of the coil. This can easily be calculated if the CFM and the Face Area of the Coil is known. The following formula can determine the velocity.
Velocity = CFM (Ft3) / Face Area of Coil (Ft2) = FPM
Velocity = 10,000 CFM / 20 Ft2 = 500 FPM
We can also use this formula to determine the required face area of the coil. Taking our CFM and dividing it by our velocity.
Face Area of Coil (Ft2) = CFM (Ft3) / Velocity (FPM) = Ft2
10,000 CFM / 500 FPM = 20 Ft2 Face Area of Coil
If the velocity is too high then condensate can be blown downstream of the drain pan. Moisture carryover can leak out of the ductwork and cause damage to the building or within the air handler.

Coil Velocity and Flow
Water coils control capacity by modulating the flow or the temperature of the water entering the coil. When the temperature of the water is adjusted to track demand then the velocity or flow remains relativity constant. When flow is used to control capacity the velocity through the tubes will change when the control valve modulates the quantity of water through the coil. Some coil manufacturers suggest velocities from 1 to 12 feet per second.
When water velocities are too high there can be tube erosion, noise and high pressure drops. If velocities are too low, there could be tube fouling, air trapped in the coil, poor water distribution and the risk of freezing.
Less water is usually flowing in a Heating Hot Water coil as compared to a Chilled Water coil due to the different delta-t temperatures used in each system. Heating hot water systems use higher Delta-T’s allowing for lower flow volumes (GPM)
Water Coil Coatings
Coatings are provided to protect the coil from harsh environments, such as that encountered near coastal areas or offshore where the equipment is exposed to salt water. They’re also beneficial for harsh industrial environments such as oil refineries and electrical generation facilities.
After the coils are manufactured, they’re shipped to the coating factory where the coils are washed to remove any dust, dirt or residue from fabrication and transporting. Next, they’re rinsed in several baths of deionized water before they enter the coating tank. After the protective coating is applied the coil will go through several rinsing tanks or spray booths before entering a large oven to ensure that the coating is cured. The curing process ensures that the coating will adhere to the coil and prevent it from flaking off, pitting, while avoiding corrosion. The complete coil surface, fins and cracks and crevices will be covered with the coating, while still allowing air flow and heat transfer.
There is an option to provide an additional coating to protect against the UV rays of the sun, just like you might put on sunscreen before heading out for a day at the beach.
There is also the option of providing copper fins which adds another level of corrosion protection, but also adds additional cost. Another option for less sever applications would be to have just the fins precoated before assembling.
Bypass Air
A small percentage of air will bypass the coil and be untreated. This is a very small percentage that is based on how many rows and fins per inch the coil has. The amount of air that is bypassed is reduced when there is an increase in coil rows or fins per inch, or a reduction in air velocity. This accounts for less than 1% of the total air.
Coil Arrangement
Coils can be arranged within HVAC equipment or as stated previously, as part of a bult-up system. Coils can be before the supply fan which is called a Draw-Thru arrangement, or the coils can be after the fan in which it is referred to as a Blow-Thru.
Duct Mounted Coils
These coils are usually used for reheating and are installed in the ductwork feeding the zone. They can be attached to the ductwork with flanges or with a SMACNA standard S & Drive connection.
Venting and Draining
It’s important to provide a method of removing air from a coil and having the ability to drain the coil. A connection at the top of the header provides for the removal of air, while a connection at the bottom of the coil provides a method for draining.
Coil Selection
Most coil manufacturers have coil selection software to quickly provide coil options on the entered design parameters. If an increase in capacity is needed, there are four common ways to achieves this. The first would be to increase the face area of the coil, next would be to increase the number of rows of coil, another would be to increase the number of fins per inch, and lastly provide closer tube spacing.

The counterflow coil arrangement is more efficient for a chilled water coil, with a supply temperature range of 42 to 44
