


 Overrides: Risks, Failures, and Best Practices")


Chapter #1 – HVAC Equipment – MEP Estimating Spreadsheet
You begin by opening your electronic estimating spreadsheet and entering the HVAC equipment listed on the equipment schedules which can be found on the mechanical drawings.
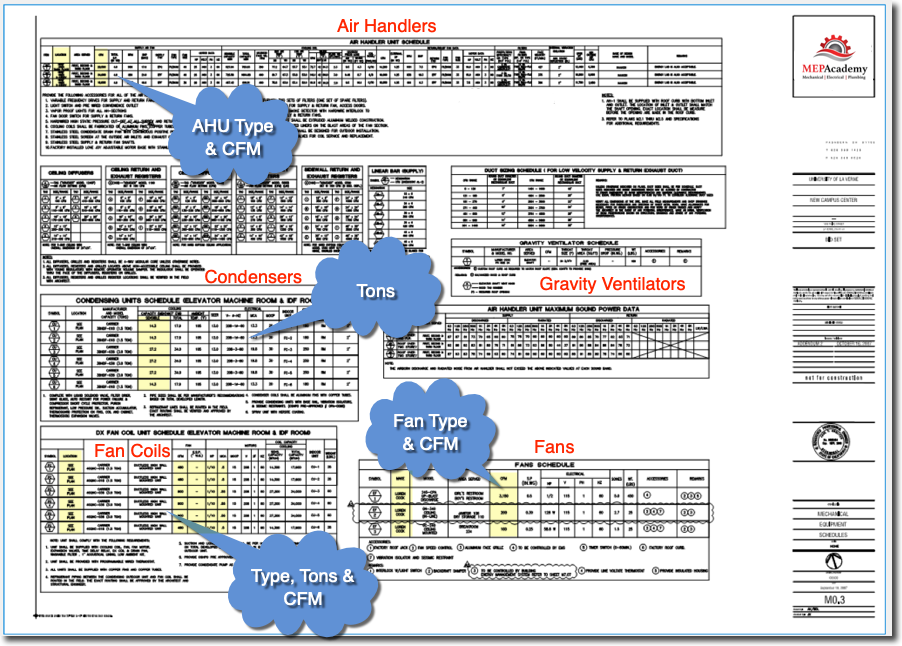
Record only the pertinent information that will help you figure labor hours for setting the equipment. Manufactures model numbers are of no use on the estimating spreadsheet, as they don’t provide any useful information for laboring the equipment.
After recording all of the equipment listed on the Equipment schedules, you’ll need to review the drawings to verify the quantity.
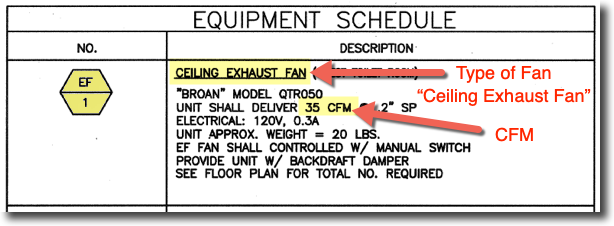
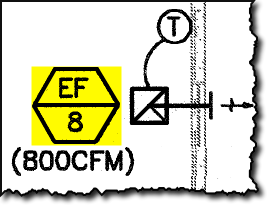
Some engineers will use the same equipment tag multiple times instead of changing the numerical value to indicate another piece of equipment that is the same; they will use the same equipment tag for multiple pieces of equipment that are the same make and model number. For instance, if the drawings have 30 of the same exhaust fan, the engineer may decide to use the equipment tag EF-1, instead of EF-1 through EF-30.
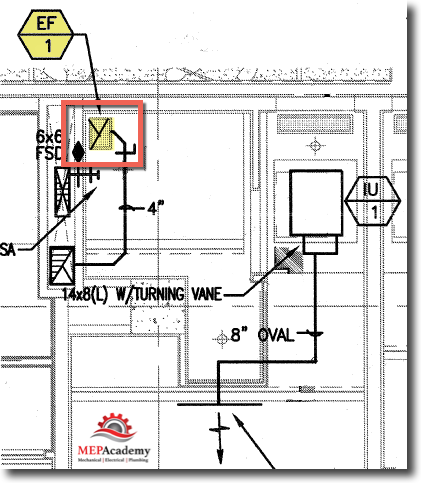
As shown below this engineer used the same tag (EF-1) for multiple locations, so don’t assume that there is only one as might be implied by the equipment schedule or the vendors quotation, always confirm by reviewing the drawings and details.
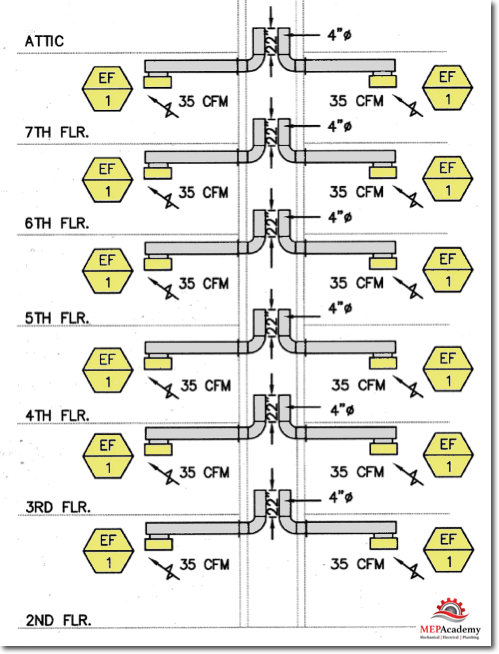
The above riser diagram is from a hotel where each bathroom had the same ceiling fan installed. The engineer in order to reduce the space required on the equipment schedule, listed the ceiling fan only once, which makes sense, but requires you to double check the drawings and vendor quotes for accuracy of quantity.
HVAC Equipment Tab on Estimating Spreadsheet
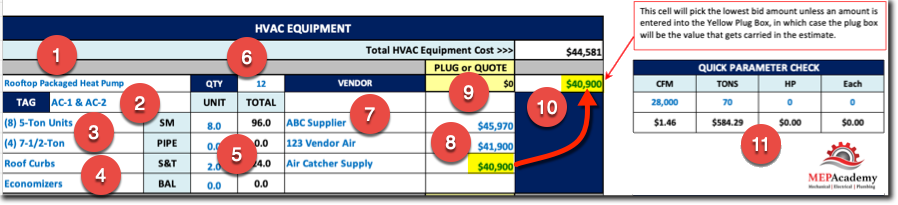
The purpose of the HVAC Equipment tab on your estimating spreadsheet is to allow a place to record vendor quotes (#8) and provide field installation labor (#5) for the equipment. Capacity (#3), weights and dimensions are more useful information, including the number of pieces the equipment comes in shipped from the manufacture or anything that would impact labor, including accessories (#4) that need to be field installed. Field installed items might include economizers, backdraft dampers, curbs, duct mounted smoke detectors and VFD’s.
Review Drawings
There are certain pieces of HVAC equipment or accessories that will not appear on the HVAC Equipment Schedule, depending on the design engineer’s standard of practice. Items such as the vibration isolation, air distribution, fire dampers, air separators, expansion tanks, water treatment, to name a few. This makes it necessary to review the drawings, details, control diagrams and specifications for unscheduled equipment and accessories.
Another factor that differs from one engineer to another is how they use equipment tags (#2 in above screen shot). Equipment tags like that shown below as EF-8 are used on the plans to identify which piece of HVAC equipment it refers to on the equipment schedule.
Owner Furnished Equipment
It’s common for some companies to have a national purchase agreement with major HVAC equipment manufactures in the hopes of saving the contractors markup fee, and negotiating a better price for national purchasing of a lot of equipment for various projects or stores owned. You will still need to list the owner furnished equipment as you will be responsible for unloading, rigging and setting of the equipment. Make sure to indicate on the estimating spreadsheet that the equipment is owner furnished.
HVAC Equipment Quantity (#6)
Enter the quantity of equipment (#6) into your Estimating Spreadsheet for each similar type of HVAC equipment you are itemizing. Remember not to rely on the equipment schedules for the quantity, but search through the drawings counting each piece as you mark them off. Vendors often make mistakes on quantities, so it’s important that you do your count.
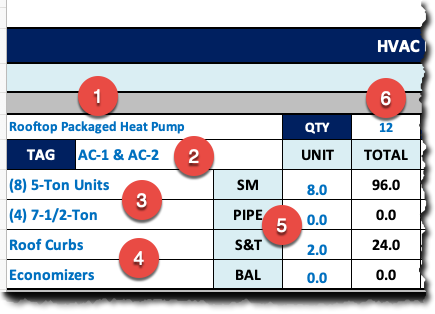
HVAC Equipment Tag (#2)
Put the equipment tags (#2) into the proper location on the estimating spreadsheet. Tags like EF-1 for Exhaust Fan #1, and AC-1 for Air Conditioner #1. Start with the most expensive equipment first or just lists them as you find them on the equipment schedules. Put a small check mark next to each of the equipment schedule titles to indicate that you have entered the information into the estimating spreadsheet.
HVAC Equipment Description (#1) & (#3)
Put a brief description of the equipment into the estimating spreadsheet. The title (#1) of the equipment is used first, such as Rooftop Heat Pumps, VAV Terminals, Air Handlers and the like. Underneath the title is where you’ll put the minimum information required to help you labor the item, information such as capacity (#3), weight and dimensions.
With an Air Conditioner you might put the Tons, CFM, and weight and list any accessories that require field labor such as economizers (#4). Indicate whether it sits on a roof curb (#4) or vibration isolation. Exhaust fans are listed by their type, such as Inline Fans, Ceiling Mounted Fans, Utility Fans, Roof Exhausters and the like, along with their CFM and weight.
Manufactures model numbers are not necessary because they give no useful information for laboring except for those pieces of HVAC equipment where model numbers indicate capacity.
Equipment Unit Labor Values (#5)
There are four categories of labor for HVAC equipment (#5) depending on the scope of work you intend to bid on. The options for labor units include Sheet Metal, HVAC Piping, Start and Test, and Balancing Labor. If you don’t do your own Air & Water Balancing or if mandated to be by a third party, then this cost will be covered by your Air & Water balancing subcontractor.
You put in the unit labor value for the quantity of one of these pieces of equipment and the total hours will be based on the quantity of this equipment. If you use 8 hours as your unit value for the rigging and setting of a utility fan and you have two (2) of them, then the spreadsheet will automatically multiply your unit value by the quantity to derive at a total labor of 16 hours for the sheet metal crew.
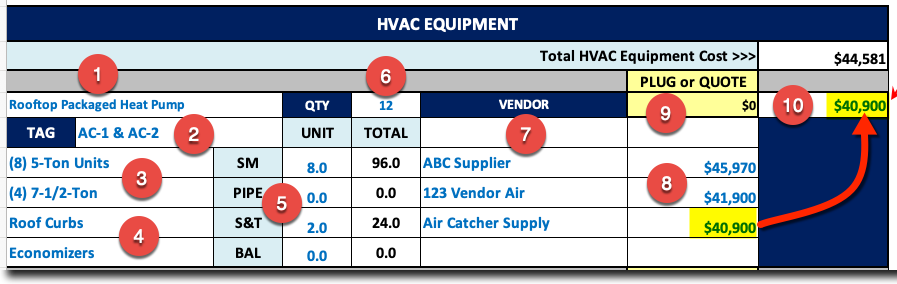
HVAC Equipment Vendor (#7)
List the company (#7) that is bidding on the piece of HVAC equipment identified by the equipment tags. These will most likely be the manufactures representative unless the manufacture sells direct to the contractor.
HVAC Equipment Quote (#8)
Here’s where you put the quotation amount (#8) that your vendors provide. The quotes are automatically compared for the lowest value, but can be overwritten by the user putting a value in the yellow highlighted plug box. Sometimes you don’t want the lowest bidder because their quote is incomplete or they’re not specified as an approved manufacture.
Plug or Quote (#9)
With the MEP Academy Estimating Spreadsheet you can choose to plug an amount (#9) for the HVAC equipment. This is useful when building budgets using the spreadsheet, or when you want to enter an amount different then the ones quoted by your vendors.
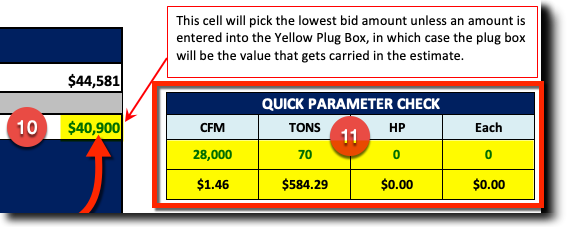
Low Bidder Automatically Selected (#10)
The MEP Academy Estimating Spreadsheet will automatically select the lowest bidder from amongst the quoted amounts (#8), unless you enter a different amount in the Plug or Quote box (#9).
Laboring the HVAC Equipment
You can labor the HVAC equipment after your sheet metal and piping takeoffs. The only step required in the beginning is to list the equipment on the Estimating Spreadsheet and notify your vendors. You can come back and labor the equipment at a later stage in the estimating process, after you have become more familiar with the project conditions. (See Chapter on Equipment Labor)
By taking off the equipment first you also get a good mental picture of the building layout and the systems being used. By the time you are done with your sheet metal and piping takeoff you will have a complete feel for the project, allowing you to better analyze the labor required to rig and set the equipment and determine any rentals you’ll need to accomplish this task.
HVAC Equipment Estimating Process
Step -1 (Notify Vendors & Subs)
Notify your vendors and subcontractors of the project and its bid date. Provide them with copies of the plans and specifications if they don’t already have copies. The use of Dropbox or other FTP sites where you can transfer large files to vendors or subcontractors will make the process much easier and faster than printing copies and sending them out in the mail.
Step – 2 (Record Equipment)
Type the list of equipment from the equipment schedule of the drawings into your estimating spreadsheet on the equipment tab, and any other equipment that is required.
Step – 3 (Labor Equipment)
After you have finished the takeoff of the trade materials such as Sheet Metal Ductwork or HVAC Piping, you can labor the equipment. Using historical data from previous projects or labor reference manuals such as SMACNA or MCAA, you can put labor for each line item into your equipment sheet of your estimating spreadsheet. You can also invite experienced office and field personnel to assist in evaluating the labor hours required for each item.
Step – 4 (Review Vendor Quotes)
Review vendor quotes and record them on your Estimating spreadsheet, choosing the lowest responsible price for that line item of equipment. This is when you review their quotation for compliance with the plans and specifications, taking note of anything they’re excluding. Reading the vendors exclusions is very important because it may still be part of your contractual obligation under the bid documents, or it could provide you notice of what you should exclude on your proposal.

Quick Parameter Checks (#11)
Your estimating spreadsheet should provide a means for verifying the cost metrics based on the typical benchmarks, such as CFM, Tons, HP (Horsepower) or cost each (#11). Whatever the metric used, this provides a quick check to ensure that you got the best price or that you haven’t made an input error. If you have one of the MEP Academy Estimating Spreadsheets than simply enter the values you want to measure and check to make sure that the cost metric makes sense.
Get the MEP Academy Estimating Spreadsheet here >>> MEP Academy Estimating Spreadsheet

Understanding the MEP Estimating Spreadsheet (Free Course)
- Chapter #1 – HVAC Equipment
- Chapter #2 – HVAC Quotations
- Chapter #3 – Subcontractors
- Chapter #4 – Sheet Metal Material and Labor Summary
- Chapter #5 – Labor Rates
- Chapter #6 – Rentals
- Chapter #7 – General Conditions
- Chapter #8 – Finalizing the Estimating Spreadsheet